Simple API Example
This article demonstrates the steps required to run an API Example that completes the following:
- Logs in to Corellium.
- Retrieves the available projects on that account.
- Retrieves the available instances on the desired project.
- Creates a new instance of a virtual device.
- Uploads a custom kernel to that virtual device.
- Takes a snapshot of that virtual device.
Check out the Corellium API Documentation for a list of supported flavors and more.
Setting Up
There are two ways to get set up for this tutorial. You can either:
-
Clone the entire Corellium-API GitHub Repository and run the example within your cloned repository.
-
Or, you can clone the device_example folder and run the example on its own.
You will also need a device tree file to upload to your device. If you don't have one handy, install our example file and put it in the corellium-api/examples/device_example subdirectory.
Tutorial
- Run the following command inside the device_example directory:
npm install @corellium/corellium-api
- Now, in
main.jsreplace the values assigned to themyEndPoint,myUserName,myPassword, andmyProjectvariables with your account credentials and project name.
let myEndPoint = "https://app.corellium.com";
let myUserName = "[email protected]";
let myPassword = "<password>";
let myProject = "Example Project Name";
- Optionally, you can replace the values in
myDeviceName,myFlavor, andmyOS. Currently, the example creates a Ranchu (Generic Android) device named API Android with the 11.0.0 OS.
let myDeviceName = "API Android";
let myflavor = "ranchu";
let myOS = "11.0.0";
- Optionally, if you would like to upload a different image, edit
myFirmwareandmyFirmwarePath.
let myfile = "devicetree";
let myfilePath = "/devicetree";
- If you would like to upload a different type of image, such as a kernel choose a different
uploadfunction.
// Upload the custom devicetree
console.log("[+] Uploading custom device tree...");
await instance.uploadDeviceTree(myFilePath, myFile);
- Run the example by entering the following command into your command line
node main.js.
- Check your console to see the output.
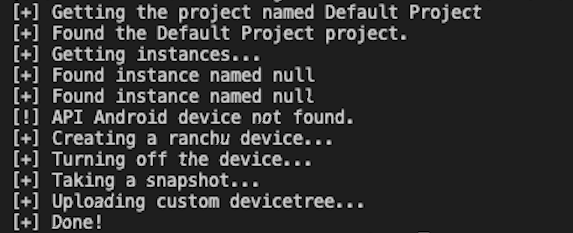
Note: if you haven't named your devices, the example will return "Found instance named null" as seen above.
Next Steps
- Find out How to Download Copies of Stock Firmware to see the process of getting the
ranchu-8.1.0-r60-userdebugfile we used in this tutorial. - Check out our GitHub Actions article for a guide on how to automate this API Example on a GitHub Runner.