Restoring a physical device to a Corellium virtual device
On a Corellium virtual device, you can restore a backup of a physical device. This is useful for bringing a physical device into the virtual world for testing and analysis without risking the physical device.
Create a Backup
You can create a backup of a physical device using a variety of tools, including:
-
idevicebackup2bylibimobiledevice, an open-source tool for backing up and restoring iOS devices.noteUsing
idevicebackup2to create a backups from virtual devices is not officially supported. While it may work for some older iOS versions, generally it is not expected to work. The recommended and supported method for creating backups of virtual devices is to take a device snapshot.
Install idevicebackup2 through Homebrew
Our testing shows that idevicebackup2 on version 1.3.0 (the latest version Homebrew gives you) has issues performing backup with some physical devices.
If you encounter the error:
Could not perform backup protocol version exchange, error code -1
This can be resolved by compiling libimobiledevice from source using the below steps based on your system architecture.
You can read more about this issue in this GitHub discussion.
# Install idevicebackup2
brew install libimobiledevice

# Ensure idevicebackup2 is functioning
idevicebackup2 -v

# Enable backup encryption
idevicebackup2 encryption on "[PASSWORD]"

# Create a new backup. This will create a folder for the iPhone UDID within the current folder.
idevicebackup2 backup --full .
Build libimobiledevice from Source for Apple Silicon Macs (arm64)
-
Install the required dependencies:
brew install autoconf automake libtool pkg-config libplist libusbmuxd libimobiledevice-glue openssl@3 git libtatsu -
Clone the
libimobiledevicerepository:git clone https://github.com/libimobiledevice/libimobiledevice.git -
Assuming homebrew is placing packages into
/opt/homebrew/opt/, export the following environmental variables using the correct paths for your system:export PKG_CONFIG_PATH="/opt/homebrew/opt/openssl@3/lib/pkgconfig"
export LDFLAGS="-L/opt/homebrew/opt/openssl@3/lib"
export CPPFLAGS="-I/opt/homebrew/opt/openssl@3/include"
export PATH="/opt/homebrew/opt/openssl@3/bin:$PATH" -
Change directories into
libimobiledevice, then build and install:cd libimobiledevice
./autogen.sh --prefix=/usr/local
make -j$(sysctl -n hw.logicalcpu)
sudo make installYou should now have a working
idevicebackup2binary in/usr/local/bin/. -
Confirm that
idevicebackup2is available and matches the expected path:$ which idevicebackup2
/usr/local/bin/idevicebackup2If the path shown is different, ensure you are using the correct path to the
idevicebackup2binary. The version shown byidevicebackup2should match the expected version:$ /usr/local/bin/idevicebackup2 -v
1.3.0-265-ga6b6c35In all commands going forward, ensure this version of
devicebackup2is being used. -
Try to peform the backup against the USB connected iOS device:
idevicebackup2 backup --full .Example output where backup encryption was enabled before starting backup:
$ idevicebackup2 backup --full .
Backup directory is "."
Started "com.apple.mobilebackup2" service on port 52729.
Negotiated Protocol Version 2.1
Starting backup...
Enforcing full backup from device.
Backup will be encrypted.
Requesting backup from device...
Full backup mode.
*** Waiting for passcode to be entered on the device ***
Build libimobiledevice from Source for Intel-based Macs (x86_64)
-
Run the following commands from your Intel based Macbook. The
limd-build-macos.shscript is also publicly available here.mkdir -p limd-build;
cd limd-build;
curl -o ./limd-build-macos.sh -L https://is.gd/3TMOiY ;
bash ./limd-build-macos.sh -
When prompted to install
macFUSE, enternfor no. This is not needed for the backup to work.Install macFUSE? [Y/n] n -
Enter
sudopassword when prompted. -
When the script completes, confirm that
idevicebackup2is available and matches the expected path:$ which idevicebackup2
/usr/local/bin/idevicebackup2If the path shown is different, ensure you are using the correct path to the
idevicebackup2binary. The version shown byidevicebackup2should match the expected version:$ /usr/local/bin/idevicebackup2 -v
1.3.0-265-ga6b6c35In all commands going forward, ensure this version of
devicebackup2is being used. -
Try to peform the backup against the USB connected iOS device:
idevicebackup2 backup --full .Example output where backup encryption was enabled before starting backup:
$ idevicebackup2 backup --full .
Backup directory is "."
Started "com.apple.mobilebackup2" service on port 52729.
Negotiated Protocol Version 2.1
Starting backup...
Enforcing full backup from device.
Backup will be encrypted.
Requesting backup from device...
Full backup mode.
*** Waiting for passcode to be entered on the device ***
Inspect the Created Backup
Finally, ZIP the backup folder created (named by the phone's UDID) into a ZIP file, which will be used for uploading to Corellium. (A properly formed ZIP will contain as a single top level folder the phone's UDID inside, with the sub-folders under it with all contents.)
Ensure you enable backup encryption before creating the backup. Without encryption, the backup won't include some sensitive user data.
$ idevicebackup2 encryption on -i
Started "com.apple.mobilebackup2" service on port 52578.
Negotiated Protocol Version 2.1
Enter new backup password: ******
Enter new backup password (repeat): ******
Backup encryption has been enabled successfully.
Restore a backup
Use the Corellium UI
To restore a physical backup, you will need to go to Settings > General in the Corellium UI. Scroll down to the section titled "Restore a VM".
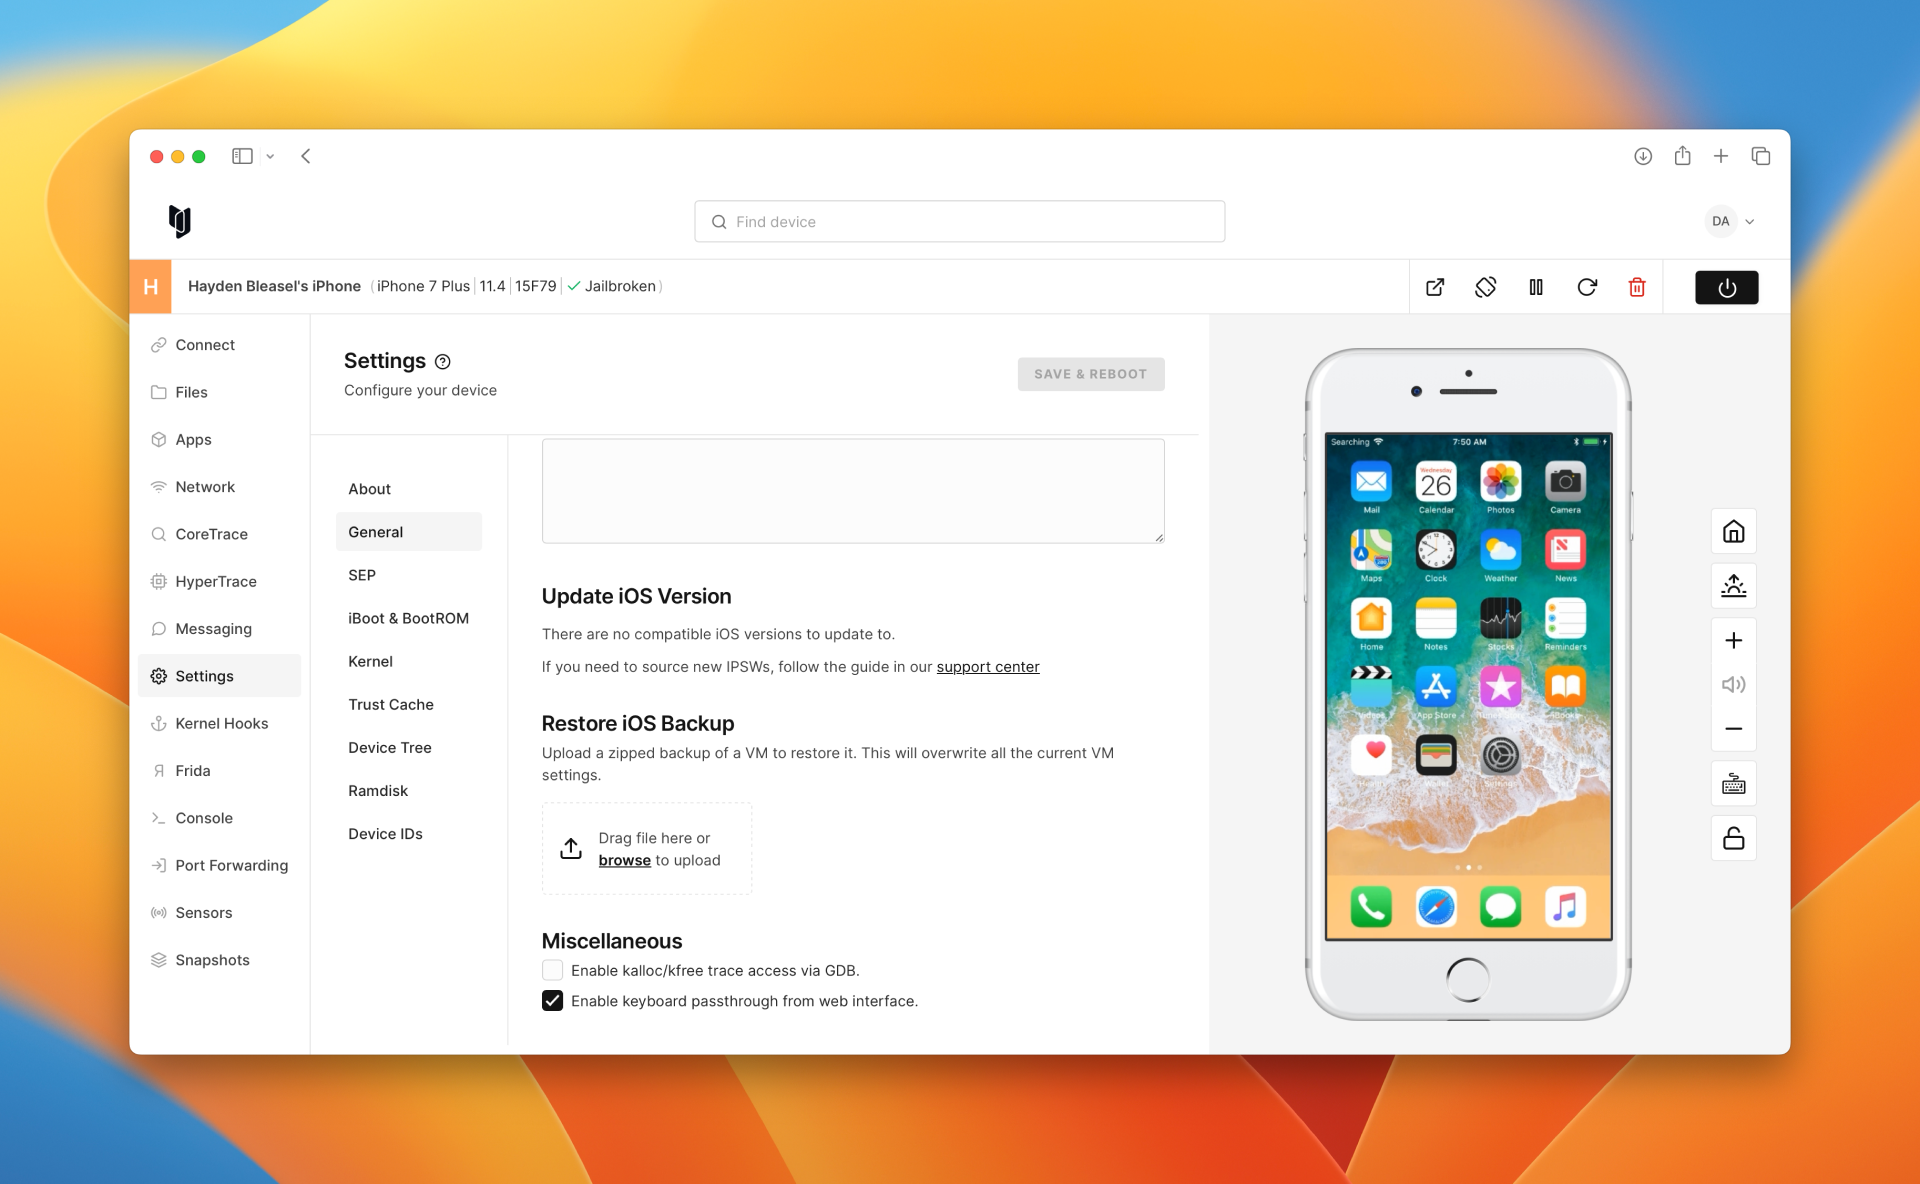
Enter a password for the backup if one is needed. Then, drag and drop your backup file into the box. Finally, scroll to the top of the page and press "Save changes".

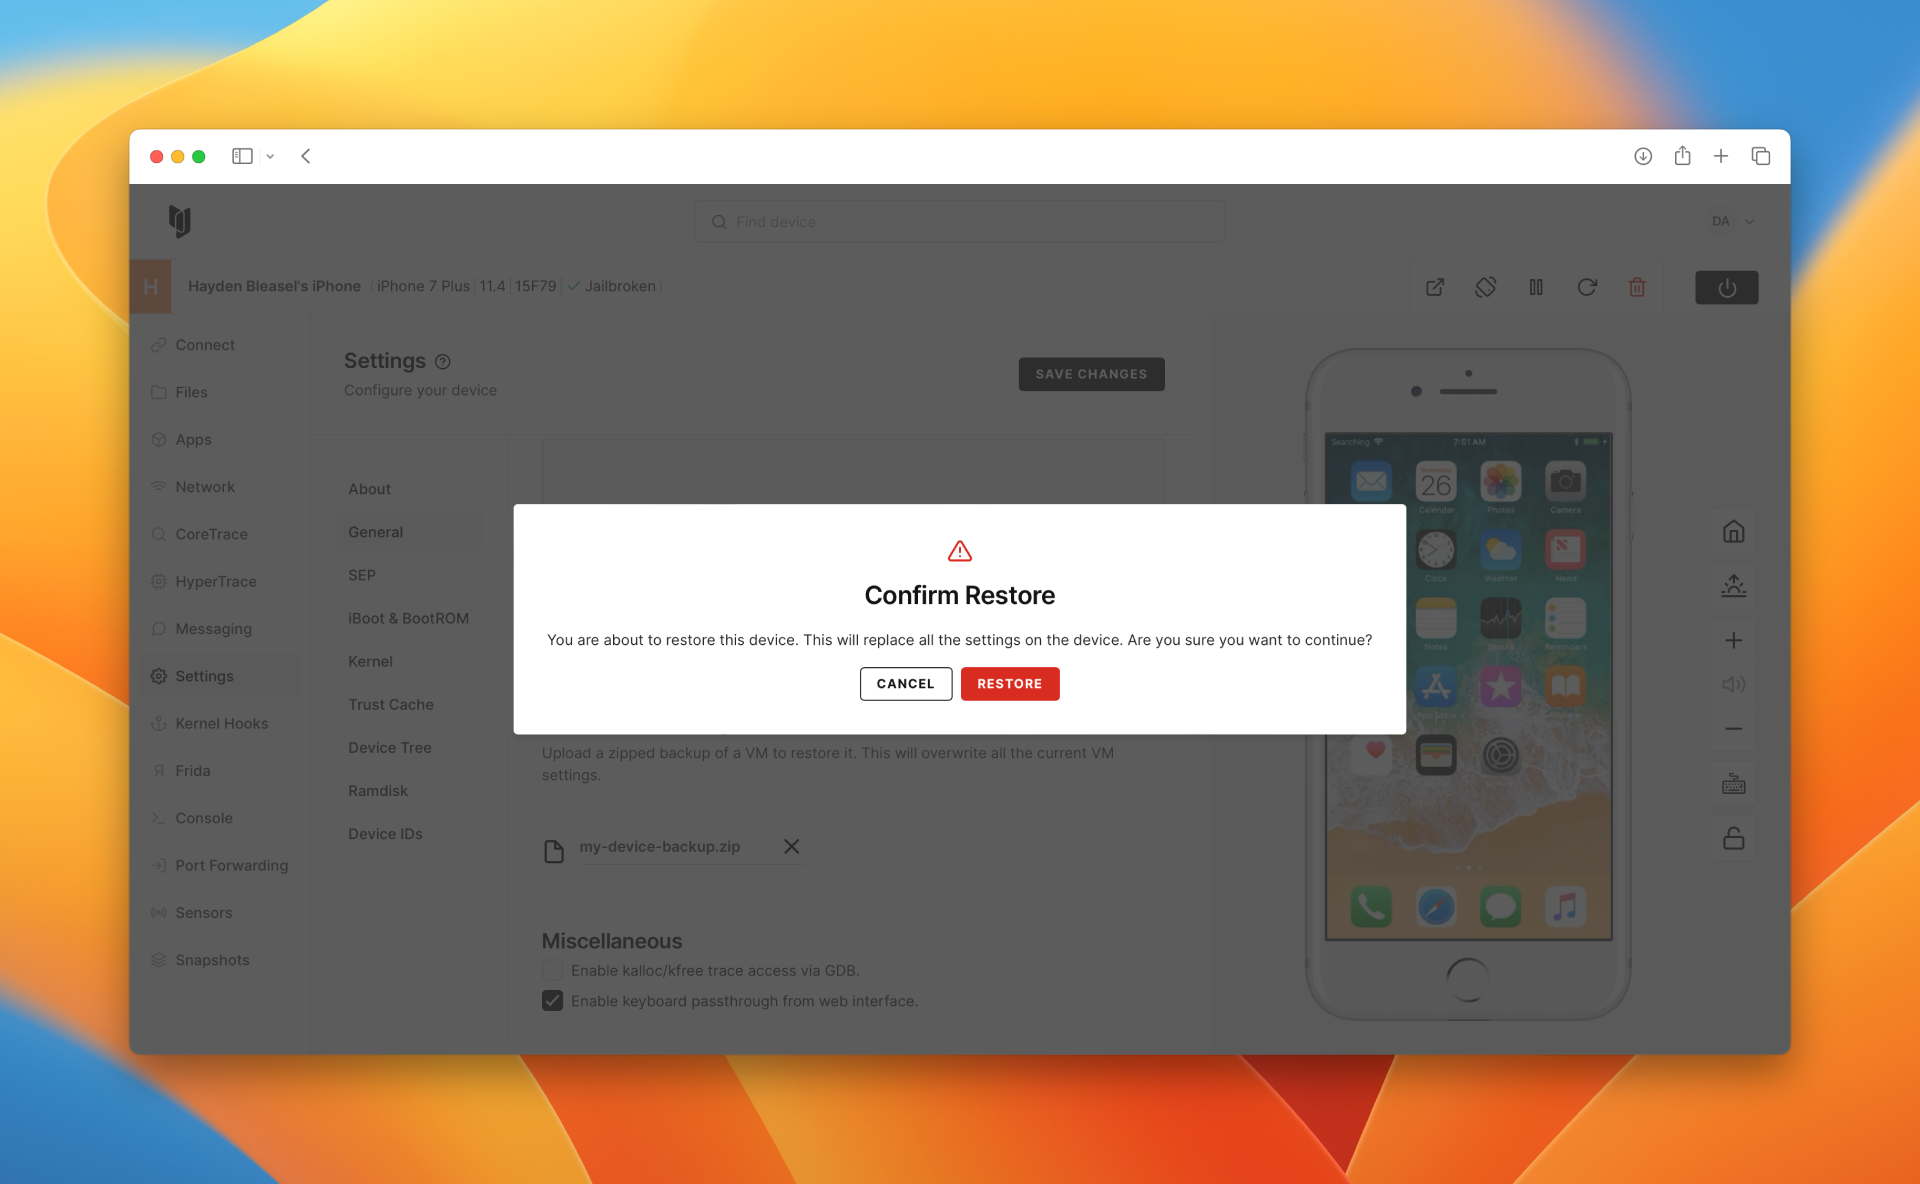
You'll be presented with a confirmation dialog. Press "Restore" to continue.
Wait for the device to upgrade and reboot.
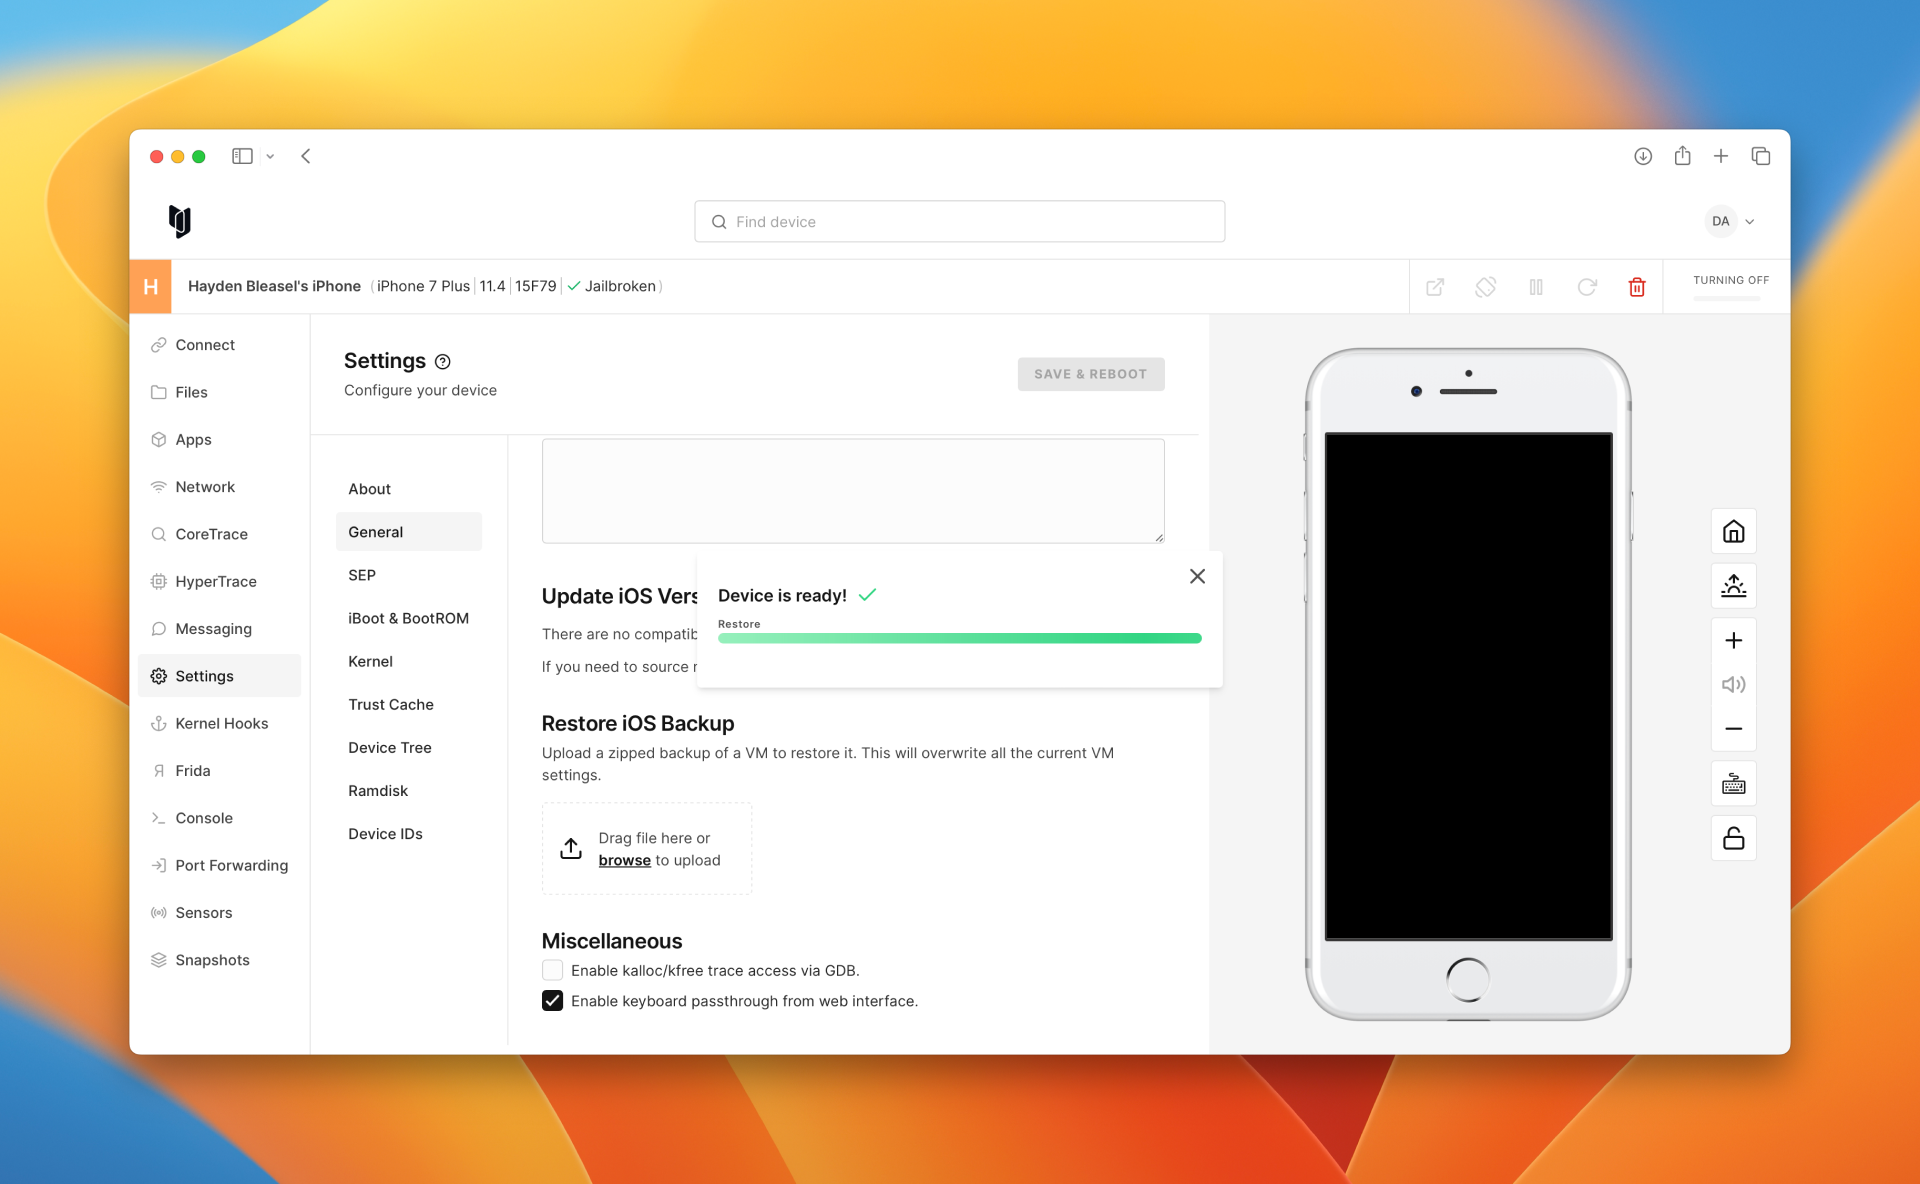
You'll be presented with a confirmation once the device has finished restoring.
Use the REST API
Use the following endpoints from our REST API:
- Upload a backup image: /v1/images
- Restore the backup: /v1/instances/:instanceId/restoreBackup
Use the v1 JavaScript API
Use the following methods from our v1 Javascript API, a node.js SDK that communicates with Corellium over WebSockets using a custom protocol:
- Upload a backup image: uploadImage(type, filePath, name, progress)
- Restore the backup: restoreBackup()
Use the v2 JavaScript API
Use the following methods from our v2 JavaScript API, which is a Javascript wrapper around our REST API:
- Upload a backup image: v1CreateImage(type, encoding, opts)
- Restore the backup: v1RestoreBackup(instanceId)
Here is an example that shows how to use the new JavaScript API to create a backup and restore it to an instance:
// NODE_TLS_REJECT_UNAUTHORIZED=0
var fs = require('fs');
var { ApiClient, CorelliumApi } = require('@corellium/client-api');
const path = require('path');

var defaultClient = new ApiClient('https://app.corellium.com/api');
// Configure Bearer (ApiToken or JWT) access token for authorization: BearerAuth
var BearerAuth = defaultClient.authentications['BearerAuth'];
BearerAuth.accessToken = '[access_token]';
// process.env.CORELLIUM_API_ACCESS_TOKEN;

var api = new CorelliumApi(defaultClient);

// var args = process.argv.slice(2);
var instance = '[instance_id]'; // args[0]

var backup = path.join(__dirname, 'backup.zip');

fs.readFile(backup, (err, data) => {
  if (err) {
    console.error('Error reading the file:', err);
    return;
  }

  var opts = {
    encapsulated: false,
    instance,
    name: 'backup.zip',
    file: data,
  };

  api
    .v1CreateImage('backup', 'plain', opts)
    .then((image) => {
      api
        .v1RestoreBackup(instance)
        .then(() => {
          console.log('Done');
        })
        .catch((error) => {
          console.error(error);
        });
    })
    .catch((error) => {
      console.error(error);
    });
});
Use the Python API
Use the following methods from our Python API:
- Upload a backup image: v1_create_image(type, encoding, encapsulated=encapsulated, name=name, project=project, instance=instance, file=file)
- Restore the backup: v1_restore_backup(instance_id)
Here is an example that shows how to use the Python API to create a backup and restore it to an instance:
import os
import asyncio
import corellium_api
from corellium_api.rest import ApiException

# The client must configure the authentication and authorization parameters
# in accordance with the API server security policy.
# Examples for each auth method are provided below, use the example that
# satisfies your auth use case.

# Configure Bearer authorization (ApiToken or JWT): BearerAuth
configuration = corellium_api.Configuration(
    host = "https://app.corellium.com/api"
    ssl_ca_cert = "./ca_cert.cer"
)
configuration.access_token = '[access_token]'

async def main():
    # Enter a context with an instance of the API client
    async with corellium_api.ApiClient(configuration) as api_client:
        # Create an instance of the API class
        api_instance = corellium_api.CorelliumApi(api_client)
        try:
            instance_id = '[instance_id]'

            image = await api_instance.v1_create_image('backup', 'plain', encapsulated='false',
              name='backup.zip', instance=instance_id, file='../backup.zip')

            print(f'Uploaded backup image ${image.id}')

            await api_instance.v1_restore_backup(instance_id)
            print(f'Backup restore successful')
        except ApiException as e:
            print('Exception when calling CorelliumApi->v1_restore_backup: %s\n' % e)

asyncio.run(main())
Use the CLI
Use the following commands from our CLI (after saving credentials, see corellium login -h):
-
Upload a backup image using
corellium image create:corellium image create <projectId> backup.zip backup plain ./your_local_backup_filename.zip -
Restore the backup using
corellium instance restore-backup:corellium instance restore-backup <instanceId> ./your_local_backup_filename.zip [password] [--verbose]
Use idevicebackup2 and USBFlux
After installing USBFlux and synthetically connecting your virtual device, you can use the following code to restore a backup:
# Check that the virtual device is connected.
idevice_id

# Restore backup to Virtual Device
idevicebackup2 \
  --password "[PASSWORD]" \
  --remove \
  --system \
  --settings \
  -s '[IPHONE UDID]' \
  -u '[VM UDID]' \
  restore
Following this, the virtual device will reboot and show a progress bar under Apple logo restoring files, then boot to SpringBoard.
Interoperability
If you're restoring a backup from a physical device to a Corellium virtual device on your own, you can use a combination of backup and restore methods. The following table shows the different combinations and the expected result:
| Backup Method | Restore Method | Result |
|---|---|---|
| iTunes | iTunes | Everything is restored as expected |
| iTunes | idevicebackup2 | Everything is restored as expected, assuming flags include --remove --system --settings |
idevicebackup2 | iTunes | Unknown |
idevicebackup2 | idevicebackup2 | Everything is restored as expected, assuming flags include --remove --system --settings |
For device restores using idevicebackup2, the flags --remove --system --settings are required to restore everything. If you don't include these flags, only a partial restore will occur.
Notes
- If you're on an on-site instance, the relevant IPSWs will need to be sourced on a network-enabled device, then added to your on-site instance prior to updating. You can learn more about this process here.
- Updating an iOS device only works via the "restore" process - not "over the air" (OTA) updates.
- When an iOS device is updated, the stock Apple apps (Mail, Reminders, etc.) are automatically scheduled for an update due to a conflict in their current app signatures and those stored in the Trust Cache. Until the update is complete, they are marked as invalidated by iOS. This is a normal process and does not affect the functionality of the device, however it does mean you will need an internet connection to update the apps.
- We do not support backups from iCloud.