Usage in CI workflows
Introduction
The Corellium MATRIX solution is designed to be run as part of an existing CI pipeline for native apps. This means we assume you already have a CI pipeline set up that builds your native app with a build tool like Gradle or Xcode.
Prerequisites
For this setup guide, we'll assume that you're using GitHub Actions and have an existing CI job setup called build. We'll also assume that you have a Corellium project setup. Optionally, instead of writing this from scratch, you could use our GitHub Action to streamline the process.
Setup
1. Add the required environment variables.
The first step is to add the following environment variables to your CI job:
CORELLIUM_API_TOKEN- Your Corellium API tokenCORELLIUM_PROJECT_ID- The identifier of your Corellium project
2. Create a "security-test" CI job
The first step is to create a new CI job that will be responsible for setting up the virtual device and installing your app. This job will run after your existing build job.
Taking your existing yaml file, add the following code, replacing [myapp.ipa] with the path to your app's IPA or APK file.
# ... existing code

jobs:

  build:
    # Your existing build job goes here.
    # At the end of this job, you should have an IPA or APK file.
    # This file will be used in the next job.

  security-test:

    # Running on Ubuntu.
    runs-on: ubuntu-latest

    # Only run if the "build" job was successful.
    needs: build
    env:
      bundleID: ${{ secrets.BUNDLE_ID }}

    # Here are the steps for this job...
    steps:

      # Checkout the code.
      - name: Checkout
        uses: actions/checkout@v3

      # Install Node 16.
      - name: Install Node
        uses: actions/setup-node@v3
        with:
          node-version: 16

      # Install Corellium CLI.
      - name: Install Corellium CLI
        run: npm install -g @corellium/corellium-cli

      # Login to Corellium.
      - name: Login to Corellium
        run: corellium login --apitoken ${{ secrets.CORELLIUM_API_TOKEN }} --endpoint https://app.corellium.com

      # Create a new device.
      # In this instance, we're creating an iPhone 6 running iOS 12.5.6.
      # We're then storing the instance ID in an environment variable for later use.
      # If you're testing an APK, you'll want to create an Android device instead.
      - name: Create device
        run: |
          id=$(corellium instance create iphone6 12.5.6 --name iPhone_created_via_CI ${{ secrets.CORELLIUM_PROJECT_ID }} true)
          echo "instanceId=$id" >> $GITHUB_ENV

      # Install your application.
      - name: Install application
        run: corellium apps install [app.ipa] --instance ${{ env.instanceId  }} --project ${{ secrets.CORELLIUM_PROJECT_ID }} --verbose true

      # Optionally upload a wordlist file to be used with the assessment.
      - name: Upload a wordlist file
        run: |
          wordlist=$(corellium image create --project ${{ secrets.CORELLIUM_PROJECT_ID }} --instance ${{ env.instanceId }} wordlist.txt extension plain /path/to/wordlist.txt --verbose true)
          echo "wordlistId=$wordlist" >> $GITHUB_ENV

      # Create the MATRIX assessment for an instance.
      # This will create the assessment on the virtual device, logs and other useful ephemeral data. Optionally specify the identifier for the uploaded wordlist.
      - name: Create the MATRIX assessment
        run: |
          assessment=$(corellium matrix create-assessment --instance ${{ env.instanceId }} --bundle ${{ secrets.bundleID }} --wordlist ${{ env.wordlistId }} --verbose true)
          echo "assessmentId=$assessment" >> $GITHUB_ENV

      # Start the MATRIX monitoring.
      # This will start capturing network traffic, logs and other useful ephemeral data.
      - name: Start monitoring for MATRIX test
        run: corellium matrix start-monitor --instance ${{ env.instanceId }} --assessment ${{ env.assessmentId }} --verbose true

      # Run the user actions script in the repo.
      # This will execute a set of user actions on the device, such as opening the app, signing in, etc.
      # This data is used to identify runtime-level security issues.
      # We'll cover how to write a user actions script next.
      - name: Run user actions script
        run: node tests/userActions.js

      # Stop the MATRIX monitoring.
      - name: Stop monitoring for MATRIX test
        run: corellium matrix stop-monitor --instance ${{ env.instanceId }} --assessment ${{ env.assessmentId }} --verbose true

      # Run the automated security tests.
      - name: Run MATRIX test
        run: corellium matrix test --instance ${{ env.instanceId }} --assessment ${{ env.assessmentId }} --verbose true

      # Store MATRIX report as artifact.
      - name: Download MATRIX report
        run: corellium matrix download-report --instance ${{ env.instanceId }} --assessment ${{ env.assessmentId }}

      # Store MATRIX report as artifact.
      - name: Store MATRIX report as artifact
        uses: actions/upload-artifact@v3
        with:
          name: matrix report
          path: MATRIX-*.html

      # Delete the device.
      - name: Delete device
        run: corellium instance delete --instance ${{ env.instanceId }}
3. Start committing code
Once you've added the code above, a new security-test job. This will create a new virtual device, install your app, run the user actions script, run the MATRIX test including checks, and then delete the device. Once the job has finished running, you can view the results in the report.html file, which will be available as an artifact.
Interactions
A user actions script is a JavaScript (specifically, Node.js) file that contains a set of user interactions that will be run on the virtual device. These interactions are designed to generate traffic and local data on the device, which can be used to identify runtime-level security issues. The script uses the Provide Instance Input API endpoint in the Corellium SDK.
Writing a user actions script
To start, create a new JavaScript file in your repository. For this example, we'll use test/userActions.js. Add the following contents:
import Corellium from '@corellium/client-api';

const defaultClient = CorelliumClient.ApiClient.instance;
const BearerAuth = defaultClient.authentications['BearerAuth'];

BearerAuth.accessToken = "YOUR ACCESS TOKEN";

const api = new CorelliumClient.CorelliumApi();
const instanceId = 'your_instance_id';

const main = async () => {
  await api.v1PostInstanceInput(instanceId, {
    [
      {
        "buttons": ["finger"],
        "position": [[300, 600]],
        "wait": 0
      },
      {
        "buttons": [],
        "wait": 100
      },
      // etcetera
    ]
  });
};

main();
The first object in the array is a touch event, pressing down at the coordinates { x: 300, y: 600 }. The second event waits for 100 milliseconds before clearing the touch event, effectively releasing the finger. You can add more interactions to the array to perform more actions on the device.
Example
Let's use this app as an example:
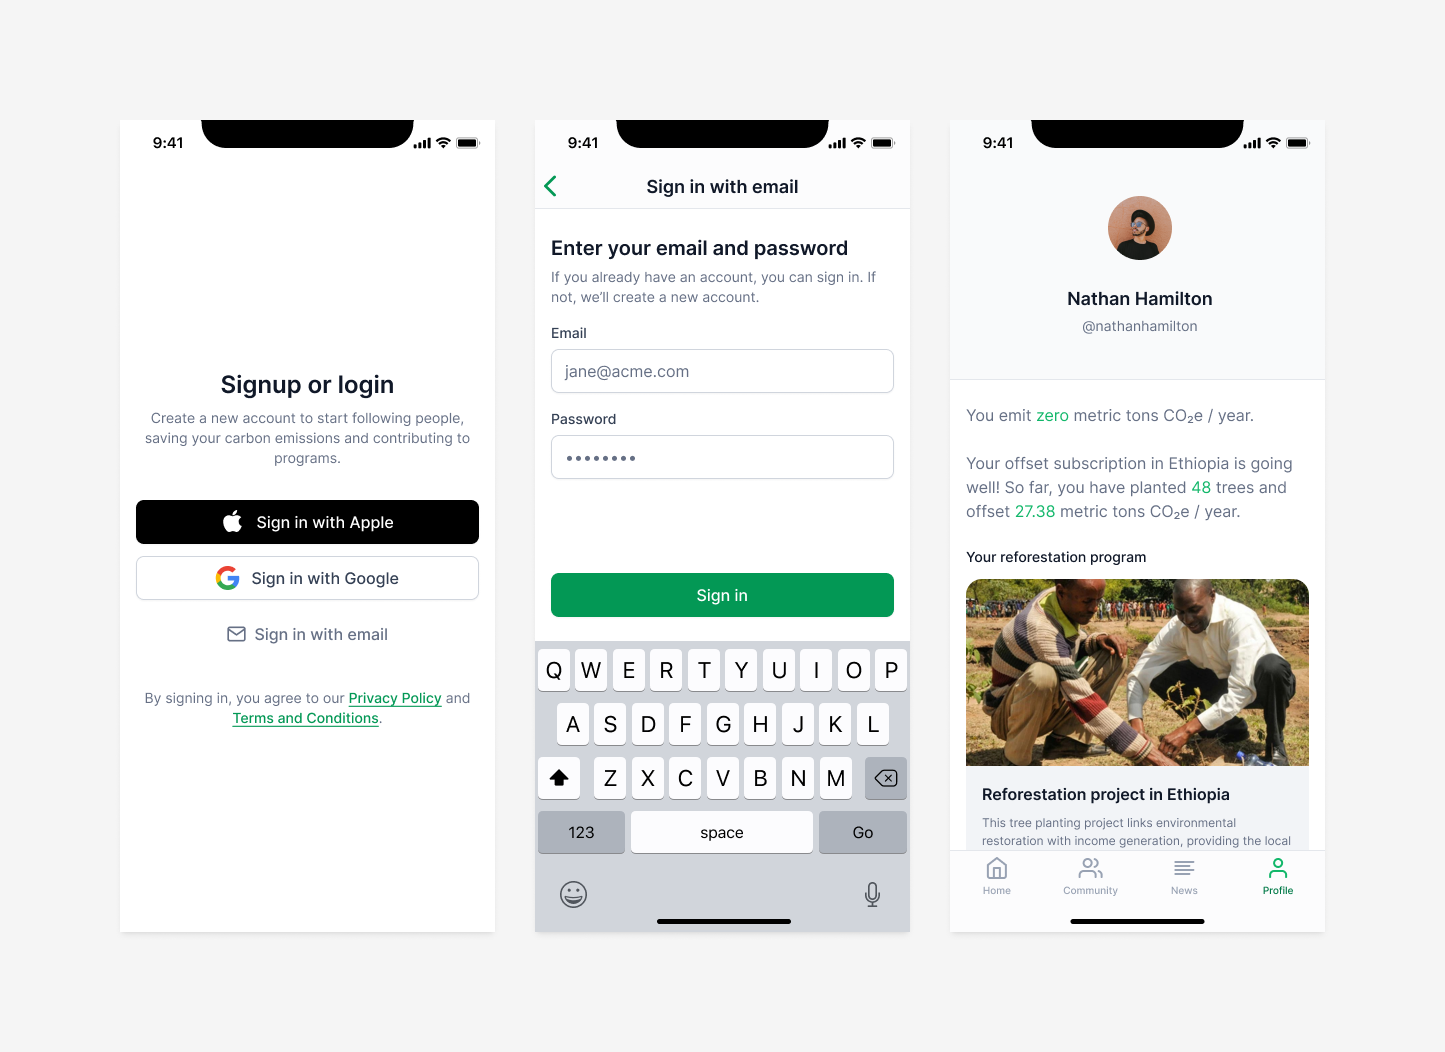
To automate the login flow, we need to do 3 things:
- Press the "Sign in with email" button
- Type in the email address and password
- Press the "Sign in" button
Here's what the v1PostInstanceInput call would look like:
await api.v1PostInstanceInput(instanceId, {
  [

    // Press the "Sign in with email" button
    {
      "buttons": ["finger"],
      "position": [[138, 505]],
      "wait": 0
    },

    // After 100ms, release the button
    {
      "buttons": [],
      "wait": 100
    },

    // After 1000ms (pending transition), press the email field
    {
      "buttons": ["finger"],
      "position": [[72, 238]],
      "wait": 1000
    },

    // After 100ms, release the button
    {
      "buttons": [],
      "wait": 100
    },

    // Type in the email address
    {
      "text": "[email protected]"
    },

    // Press the password field
    {
      "buttons": ["finger"],
      "position": [[72, 328]],
    },

    // Type in the password
    {
      "text": "my_password"
    },

    // Press the "Sign in" button
    {
      "buttons": ["finger"],
      "position": [[178, 467]],
      "wait": 0
    },
  ]
});
This script will press the "Sign in with email" button, wait for the transition to complete, press the email field, type in the email address, press the password field, type in the password, and finally press the "Sign in" button, which will land us on the Profile screen.
During this process, valuable data has been generated on the device and captured in network traffic logs that we can use to identify runtime-level security issues.