Usage in the UI
Our MATRIX solution is designed to help you identify and address security issues with your apps. This approach reduces the risk of security vulnerabilities in the virtualized mobile devices, providing a more secure experience for end-users.
Create a Virtual Device and Install your App
If you want to use MATRIX via the UI, start by creating a device, then installing your app. To automate your virtual device and application management, you can use our CLI or our various SDKs.
On Android, you need to manually adjust the device to use 4 cores and 4GB of RAM. During the creation process, choose the "Set advanced boot options" checkbox in order to adjust the amount of CPU cores and RAM on the Android device prior to running the tests. This adjustment is only needed when using MATRIX through the UI. You can see how to configure this in CPU and RAM Settings.
Create a Test
Once the device is ready, click the "MATRIX" tab on the left. Previously ran MATRIX tests will show up here, this is known as the History page. To begin a new MATRIX test, click "New test".
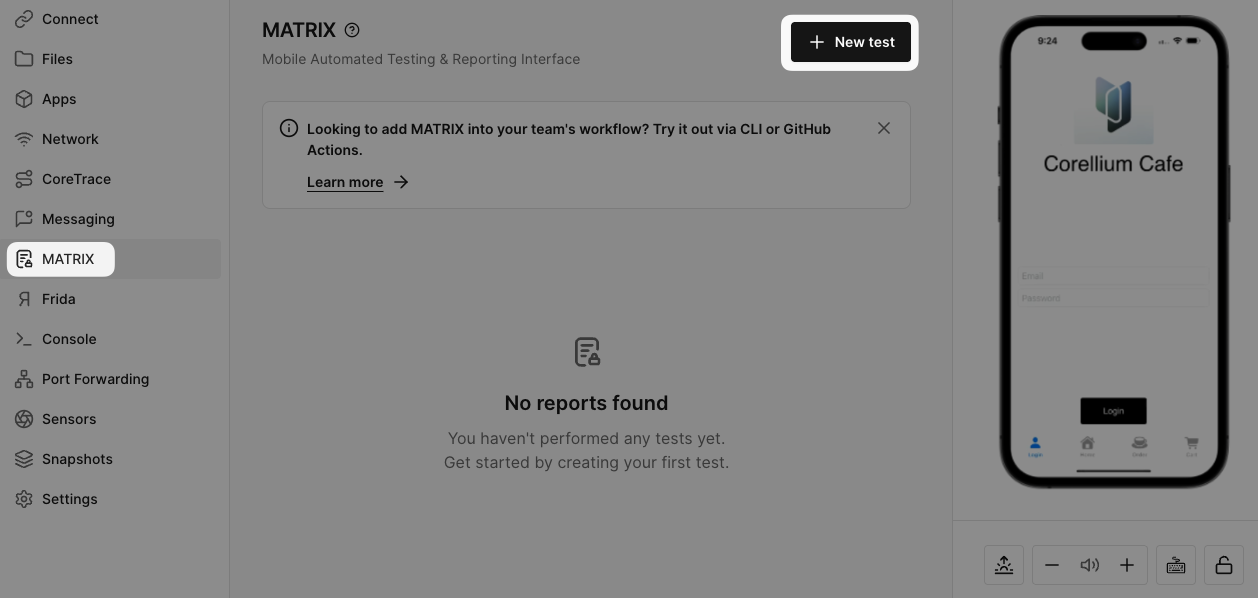
Select the desired application you want to test from the list of installed applications or install a new app. We'll be running a MATRIX test against the Corellium Cafe application.

After the app has been selected and you've pressed the "Continue" button, you can optionally upload files:
-
"keywords" text file: This is a newline-separated list of keywords that are case sensitive and will be used to search for vulnerabilities in the application. This could include things like known credentials, API keys, or other sensitive information. To specify regular expressions (regexes) in your keywords .txt file, wrap them in regex(/.../). For instance, to find all credit card numbers that start with “1234,” create a new line in the .txt file that says regex(/^1234/).
-
Frida script: The script will automatically run when we launch the application for monitoring, allowing you to bypass security controls or apply custom runtime logic during your scans.
-
The file must be written in JavaScript.
-
Users can still run their own Frida script from the Frida tab as well.
-
Please review our Known Issues MATRIX page for more information.
- iOS device supports regex.
- Frida upload file bundle format.
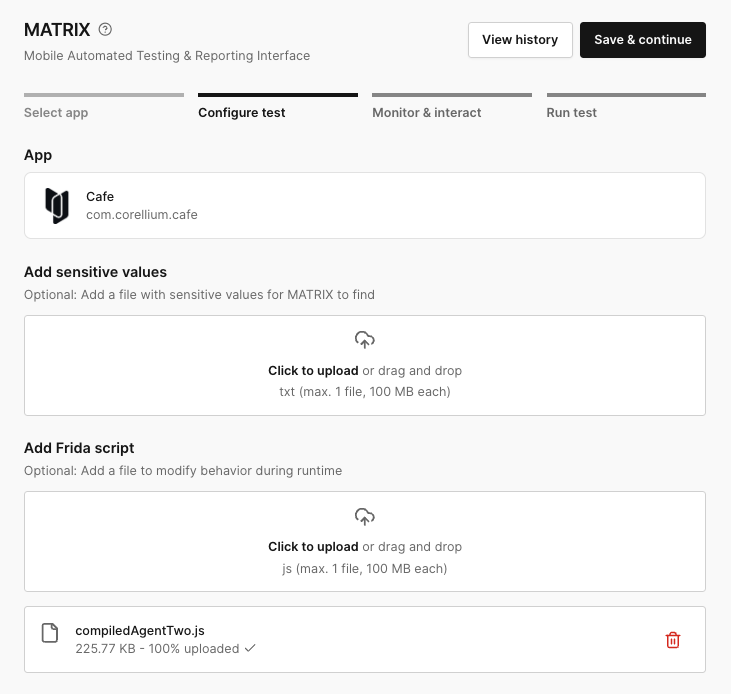
By pressing the "Save & continue" button, MATRIX will continue to the monitoring stage where you can perform the interactions with the device.
Monitor and Collect Data
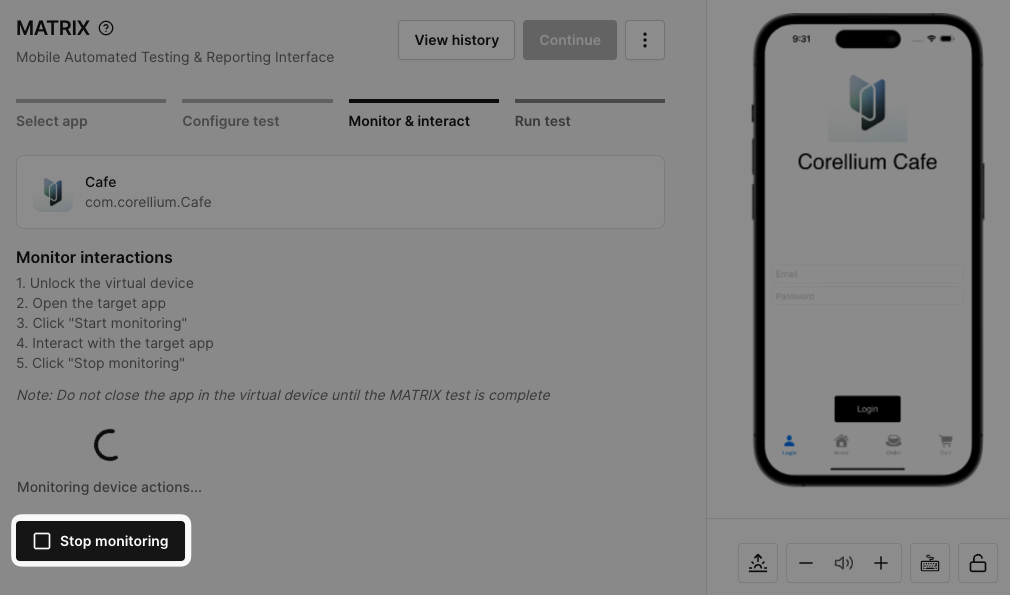
Once you've created a test, you can begin collecting data from your virtual device by clicking "Start monitoring". You do not need to start the target application manually, the app will be automatically launched after clicking start monitoring. After monitoring has begun, the app will be automatically rebooted.
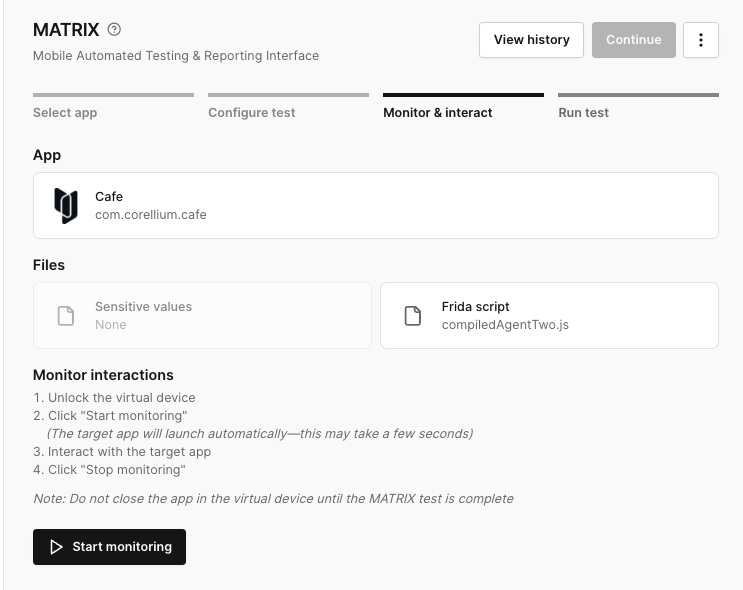
While the monitoring is in-progress, start performing all the desired interactions with the application. When you've finished, click the "Stop monitoring" button to stop collecting data. After stopping the monitor, the app will be automatically rebooted again.
When the monitoring stops you will have to click on continue to run the test.
Run the Test
Once the monitoring is complete, you'll be able to run the test, which includes the checks and artifacts. Click the "Run test" button to begin.
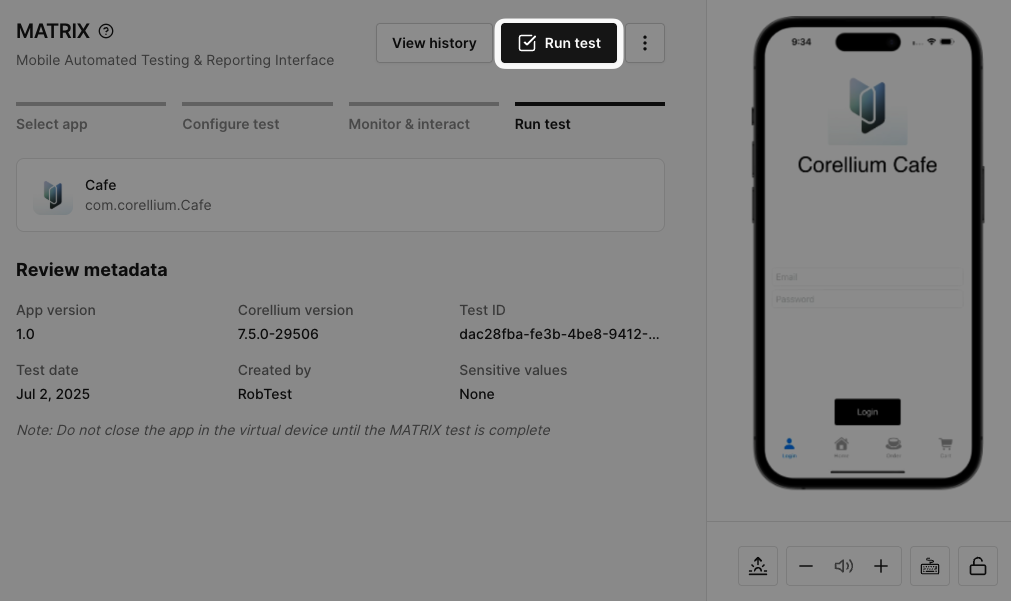
The test will run automatically from there. Once complete, you'll be able to view the results.
View the Results
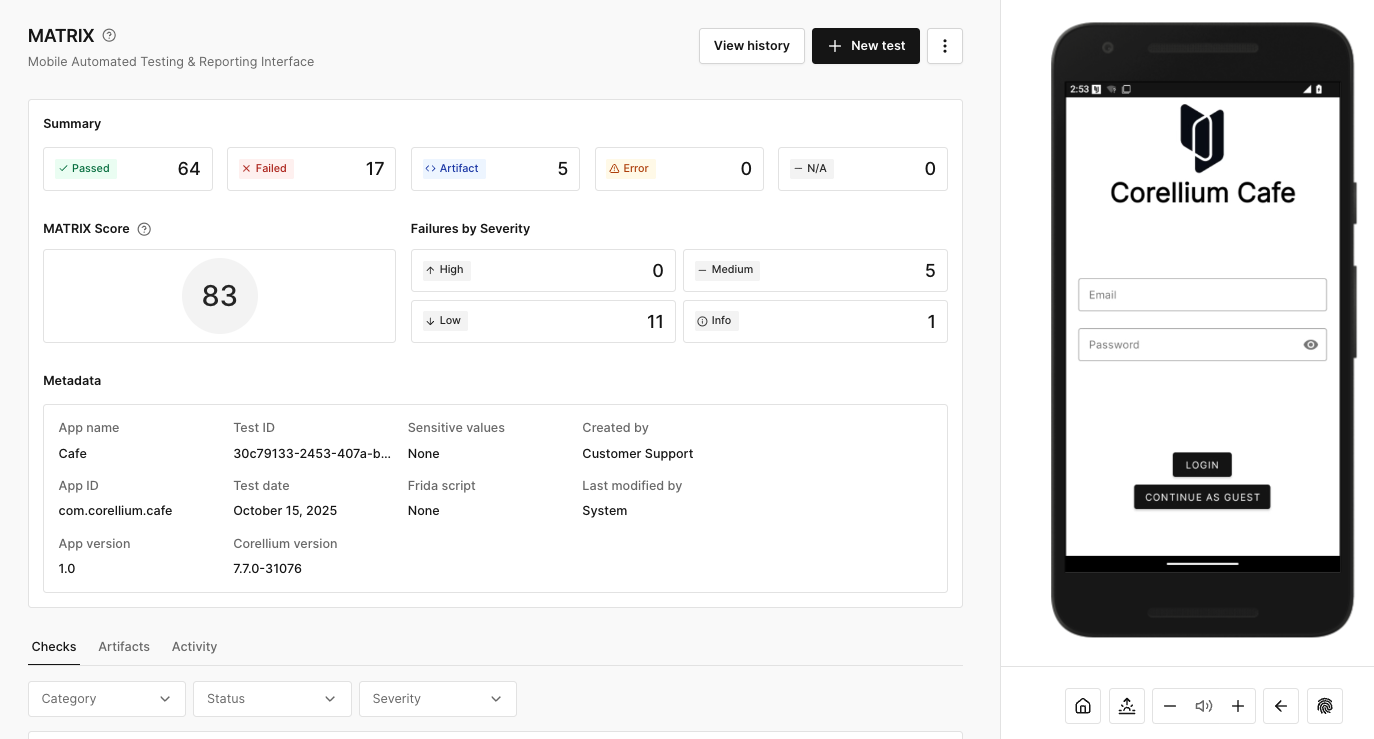
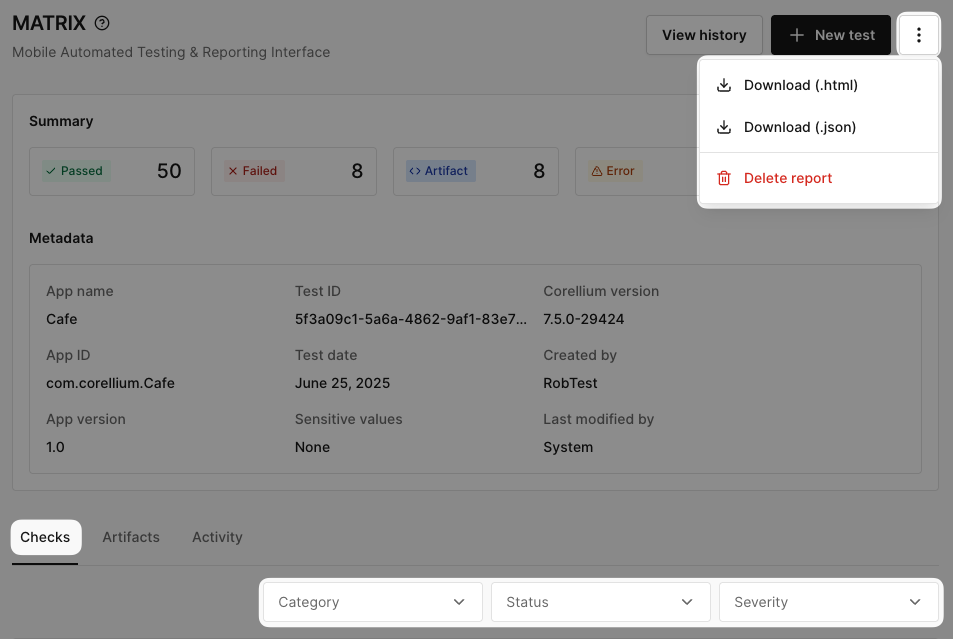
Finally, you can view your report! In our UI, the report will have detailed information about the test you just completed. The reporting interface is broken down into five sections.
Summary gives you a high-level overview of how many items passed, failed, errored, or are not applicable.
MATRIX Score is a real‑time, computed “risk score” that calculates based on the number of vulnerabilities and their severity levels identified during a mobile application security test. Learn more about MATRIX Score.
Metadata gives you detailed information about the test and your target app. This includes the App name, AppID, App version, TestID, Test date, Sensitive values (if one was used), Frida script (if one was added), Corellium version, Created by, and Last modified by.
Checks shows which Checks were run, as well as each one's Description, Status, Severity, Impact, Remediation, Compliance mapping, and Evidence (if the check failed). Learn more about Checks.
Artifacts shows which artifacts were run, as well as each one's Description, Status, Compliance mapping, and Output (if applicable) Learn more about Artifacts.
Activity gives you detailed information about changes to the report. You can filter by Date, User, Event, Item, and keywords.
Changing the Status of a Check or Artifact
To modify the status of a Check or Artifact within a MATRIX report, follow the steps below:
-
Locate the Check or Artifact: Locate the Check or Artifact you wish to modify.
-
Open the Details: Click on the Check or Artifact to expand the detail view.
-
Open the Dropdown: Look for the Status dropdown under the Description details. Click to see the correct and the available options.
-
Modify the Status: Select the preferred Status.
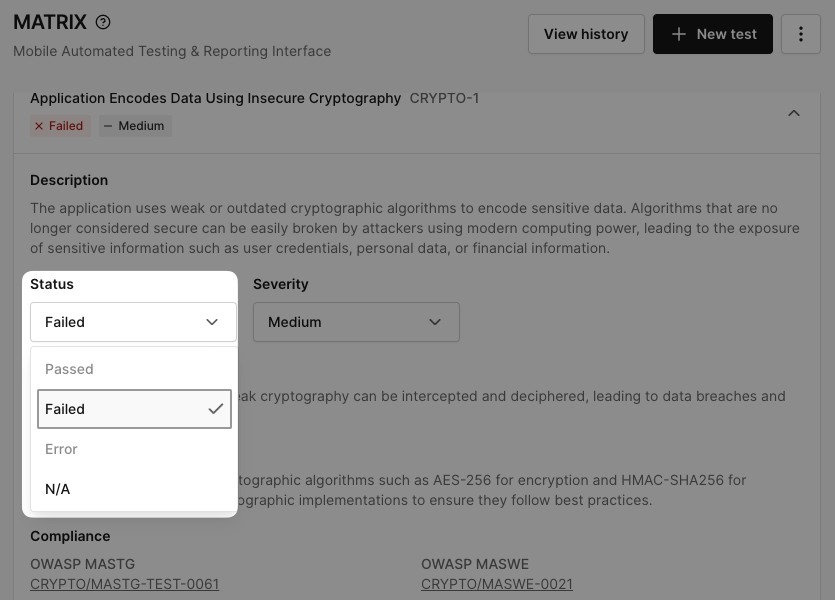
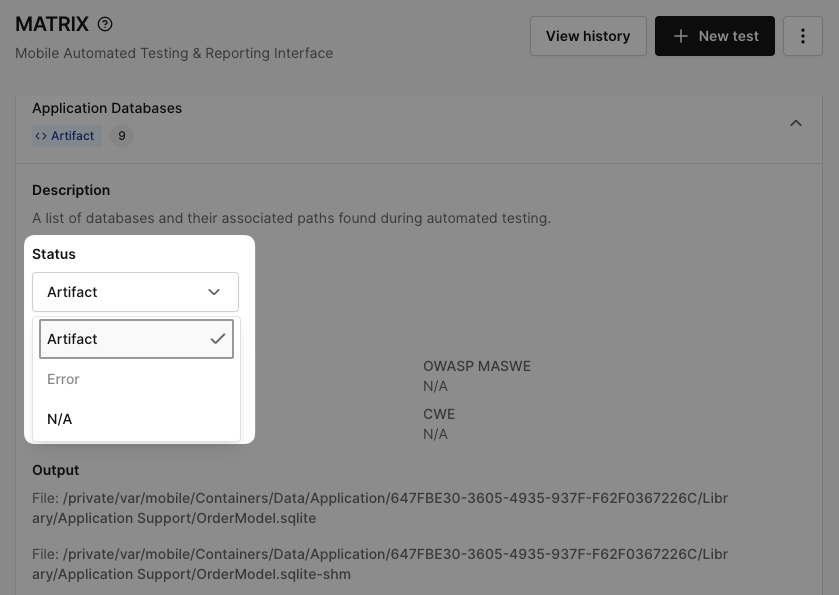
Any status changes that are made to a Check or Artifact will be reflected in the Summary section at the top of the report.
If you change a failed check to a N/A status you will see that the evidence has been suppressed in the report. This is also reflected in the downloadable HTML report.
Modifying the Severity Level of a Check
To update the severity of an existing check, follow the steps below:
-
Locate the Check: Navigate to the check you wish to modify within the report.
-
Open Check Details: Click on the check to open its detailed view.
-
Open the Dropdown: Look for the Severity dropdown under the description details. Click to see the current and available options.
-
Modify the Severity Level: Select your preferred severity
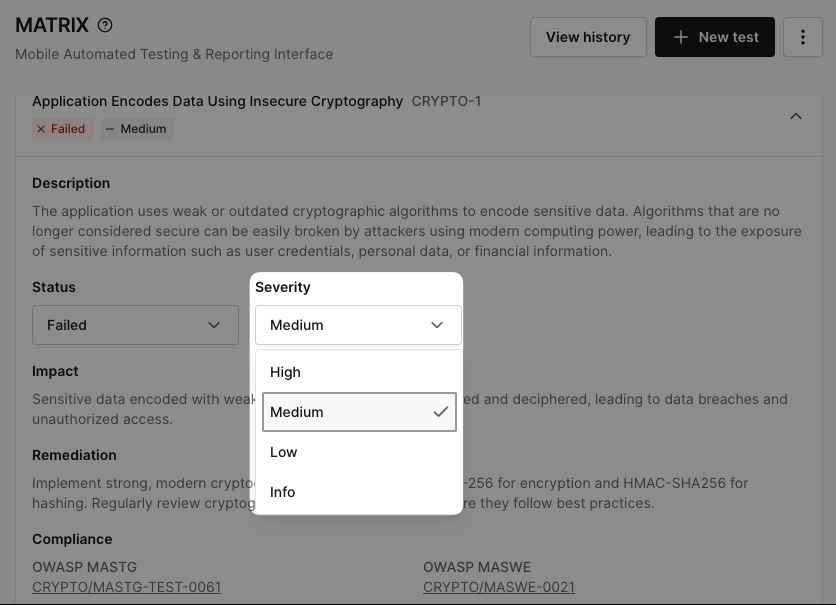
Changes to the severity level are applied immediately and will reflect in the Summary section and the downloadable HTML report.
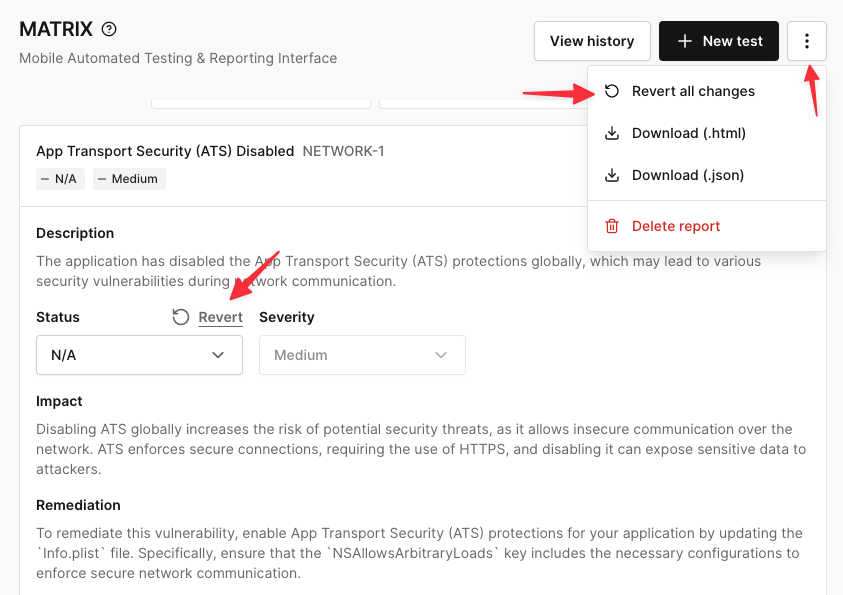
Changed Statuses and Severities can be reverted by using the Revert Icon ![]() under the kabob menu, if you want to revert all changes, or hovering on the Status or Severity fields.
under the kabob menu, if you want to revert all changes, or hovering on the Status or Severity fields.
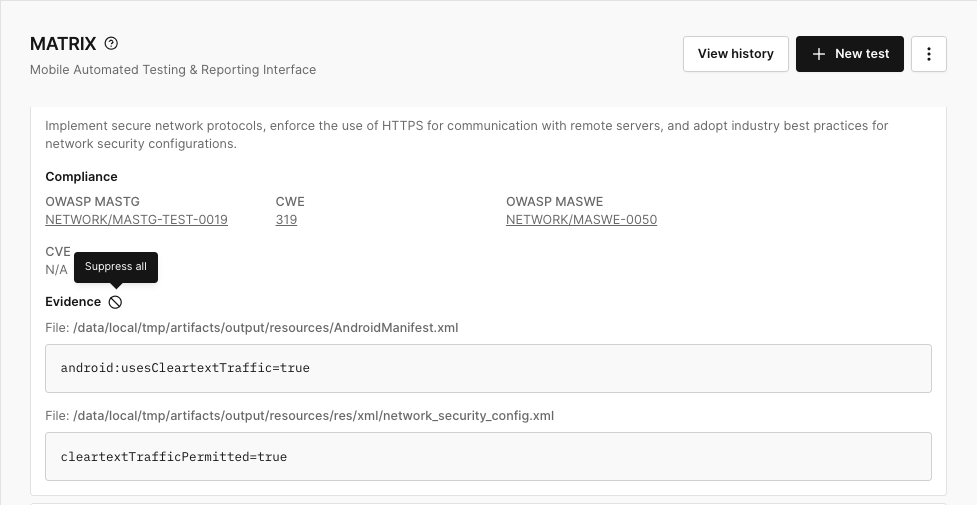
Suppress Evidence
You can suppress evidence from a failed check if it is not relevant to the specific test being performed or does not align with the organization’s testing protocols. Suppression helps maintain the accuracy and relevance of test results by allowing users to disregard non-applicable evidence without removing it entirely from the system.
If you hover on Evidence from the report, you will see this suppress icon ![]() If you click on this button this will give you the ability to suppress all of the evidence for that specific check.
If you click on this button this will give you the ability to suppress all of the evidence for that specific check.
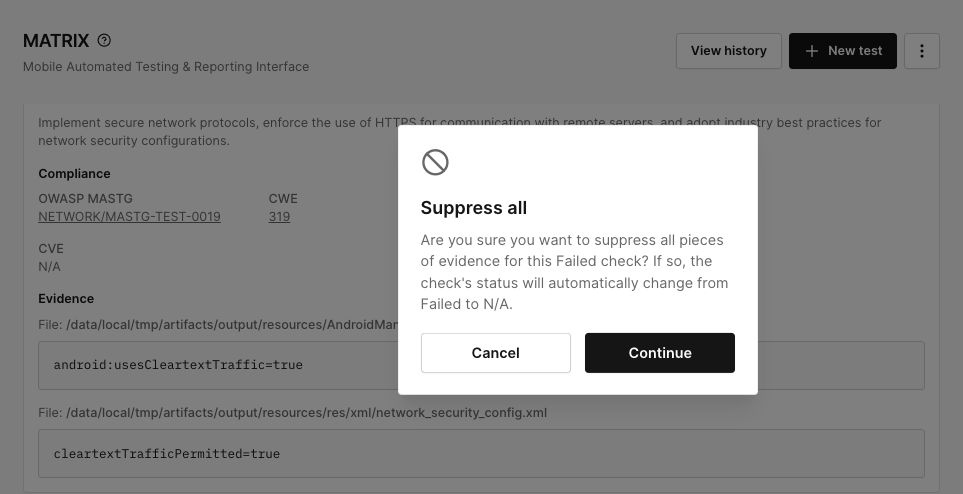
If you suppress all evidence on a check, you will be shown a popup to confirm that the system will change the check's status to "N/A".
You can also suppress individual pieces of evidence by hovering on the specific check and clicking on the suppress icon.
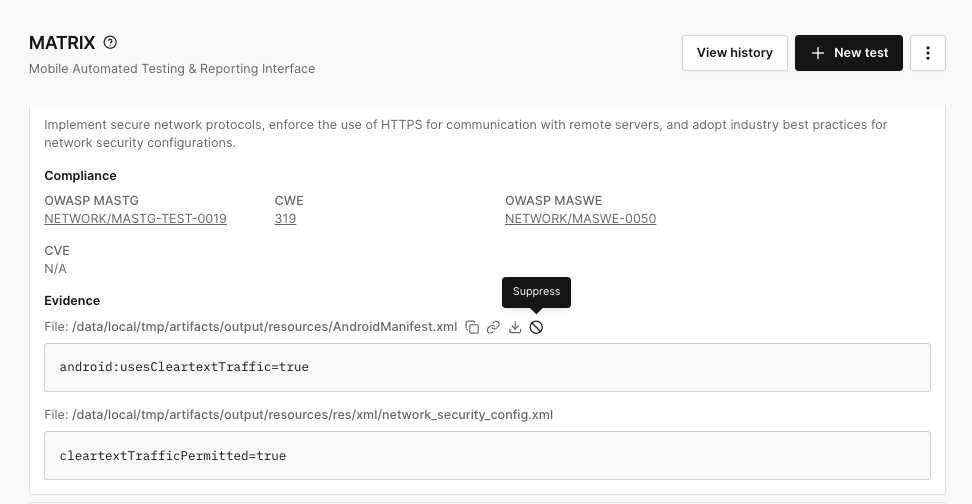
If you suppress all pieces of evidence for a given check, the check's status will automatically change to "N/A".
Reverting Suppressed Evidence
If for any reason you suppressed evidence that you want to revert back, you can do this by clicking on this Revert Icon: ![]() this will re-activate a piece of evidence or all evidence that was suppressed.
this will re-activate a piece of evidence or all evidence that was suppressed.
The Revert Icon replaces the the Suppress Icon once you have suppressed any and or all evidence. A popup will show up if you click on the Revert all Icon just to confirm that the system will change the check's status back to "Failed".
Downloading a Report
You can download the report as a JSON or HTML file by clicking the three dots in the top right corner of the results page. You can learn more about these formats on the Reporting page.
History and Retesting
You can view the results of your historical MATRIX tests and retest apps as needed. The MATRIX test history can be viewed from both an on and off device state. Click the "View History" button to view your previously ran tests. For more details, visit the History page.