Quick Connect
This feature is exclusive to users on our public cloud.
A common scenario users encounter is attempting to connect to the Corellium VPN using their project's provided openVPN configuration file in order to SSH or use ADB to connect to a device.
However, on most enterprise-grade networks, this approach often fails because it requires establishing connections to AWS IP addresses, which are frequently restricted by corporate firewalls or network policies.
The Quick Connect feature provides an alternative that allows you to access your virtual devices without needing to connect to the VPN using the provided OpenVPN configuration files in the web interface.
Quick Connect relies on standard SSH commands, which are available by default on most operating systems.
How Quick Connect Works Under the Hood
These commands are automatically generated and available for each device you create in the web interface.
iOS:
ssh -J <project_identifier>@proxy.<server>.com root@<ios_device_service_ip>
Uses a jump host in the SSH connection (ssh -J) to first authenticate with the Corellium proxy server, where the user is your project identifier and the destination is the Corellium proxy server.
Once the proxy server connection is successful, the command will attempt to SSH into the target iOS device. This works because the proxy server connects securely to your project’s network namespace, providing connectivity to your devices without exposing it beyond your isolated environment.
If you do not have an authorized key on the target iOS device, you will be prompted for password authentication.
Android:
ssh -M -Ssock -N -f -L 5001:<android_device_service_ip>:5001 <project_identifier>@proxy.<server>.com
Creates a background SSH tunnel through the respective Corellium proxy server, authenticating with your project identifier as the user.
The -L flag forwards local port 5001 on your host machine over the SSH connection to <android_device_service_ip> at port 5001 allowing you to access services running on that port as if they were local. This is required for the following command to work: adb connect localhost:5001
The -M and -S together enable SSH connection multiplexing, which allows you to reuse an existing SSH connection instead of opening a new one each time, while -N -f run the command in the background without opening an interactive shell.
This feature works because the proxy server connects securely to your project’s network namespace, providing connectivity to your devices without exposing them beyond your isolated environment.
Network Firewall Configuration
Your network firewall must allow outbound connections on Port 22 to Corellium's proxy server.
For Individual domains, the proxy server you connect to is proxy.corellium.com while Enterprise domains use proxy.enterprise.corellium.com.
You can always navigate to the web interface for your domain and confirm this at any time.
Add an Authorized SSH Public Key to Your Projects and Devices
In the public cloud environment, an SSH public key must be added to your project before connecting through the proxy server. This can be done at any time and does not require creating a new device.
For on-premises deployments, the Quick Connect feature in not available. You can still add authorized keys to your projects to enable passwordless SSH authentication, or manually add an authorized key to your iOS device at any time.
Corellium supports standard SSH keys, which make use of public key cryptography for authentication when connecting your local computer with virtual devices.
This section explains how to create new SSH key pairs using Terminal or PowerShell, add your public key to your Corellium project, and verify that it’s available on newly created devices.
Create a New Public-Private Key Pair
We will utilize the ssh-keygen tool, which is installed by default on all three major operating systems, and the Ed25519 signature scheme.
Generate a Key Pair with Terminal
- Open Terminal and run
ssh-keygen -t ed25519.- Use the default file location
~/.ssh/id_ed25519by pressing the return key. - Enter an optional passphrase for added security. In this example, we will leave the passphrase field blank.
- Confirm your optional passphrase.
- Use the default file location
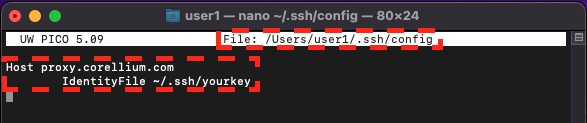
If you use a custom-named SSH key file instead of the default id_ed25519, specify it in your ~/.ssh/config using the IdentityFile option.
The corresponding public key must also be added to your Corellium project following the steps below.
The proxy host you connect to depends on whether you’re accessing an Individual or Enterprise Corellium domain.
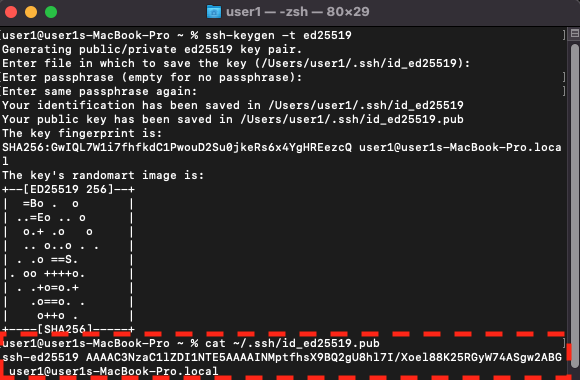
- The terminal will show the location of your identification (private key) and public key files, the key fingerprint, and the randomart image.

- View the contents of the file using
cat ~/.ssh/id_ed25519.pub.
-
Copy the output to use later. In our example, we will copy the following:
ssh-ed25519 AAAAC3NzaC1lZDI1NTE5AAAAINMptfhsX9BQ2gU8hl7I/Xoel88K25RGyW74ASgw2ABG [email protected]
Generate a Key Pair with PowerShell
-
Open PowerShell and enter
cd ~/.ssh. -
Start the key generation process using
ssh-keygen -t ed25519.- Use the default file location
C:\Users\your-user\.ssh\id_ed25519by pressing the Enter key. - Enter an optional passphrase for added security. In this example, we will leave the passphrase field blank.
- Confirm the passphrase.
- Use the default file location
-
PowerShell will show the location of your identification (private key) and public key files, the key fingerprint, and the randomart image.
-
View the contents of the file using
cat .\id_ed25519.pub. -
Copy the output, which we will use in Step 2. In our example, we will copy:
ssh-ed25519 AAAAC3NzaC1lZDI1NTE5AAAAIIURGEJFM5/YvlWysZT4nSnT5bjovGK/Uj8d6fUBsBUp <user>@Lenovo-Laptop
Add Your Public Key using Our Web Interface
-
Log in to your Corellium enterprise domain as the administrator.
-
Click ADMIN on the top-right menu to open the Admin Panel and go to the Projects tab.
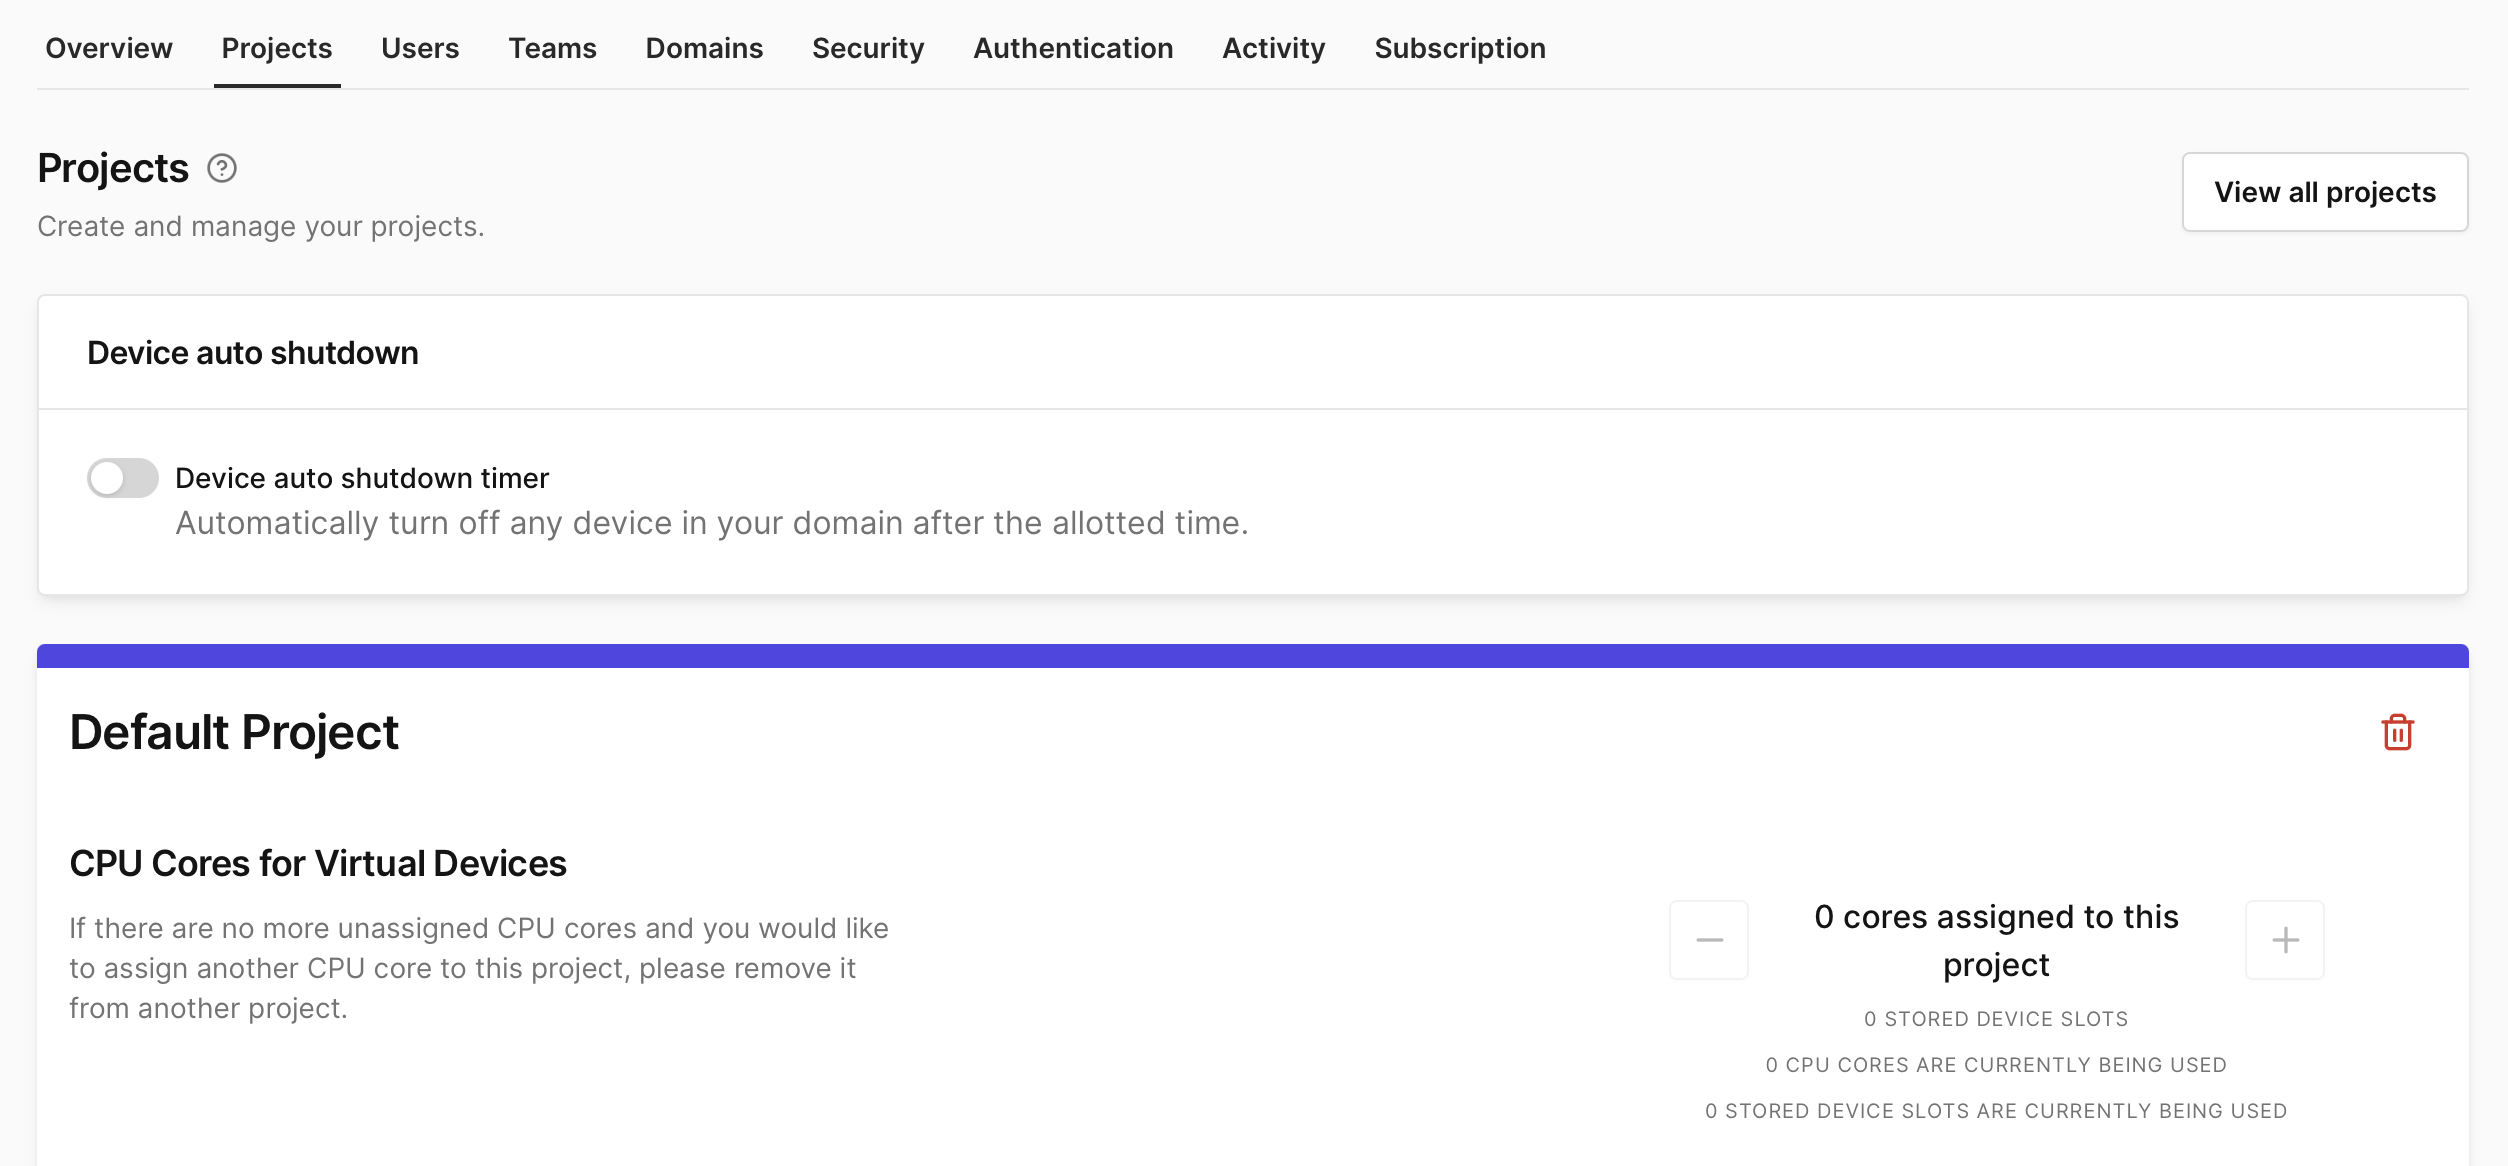
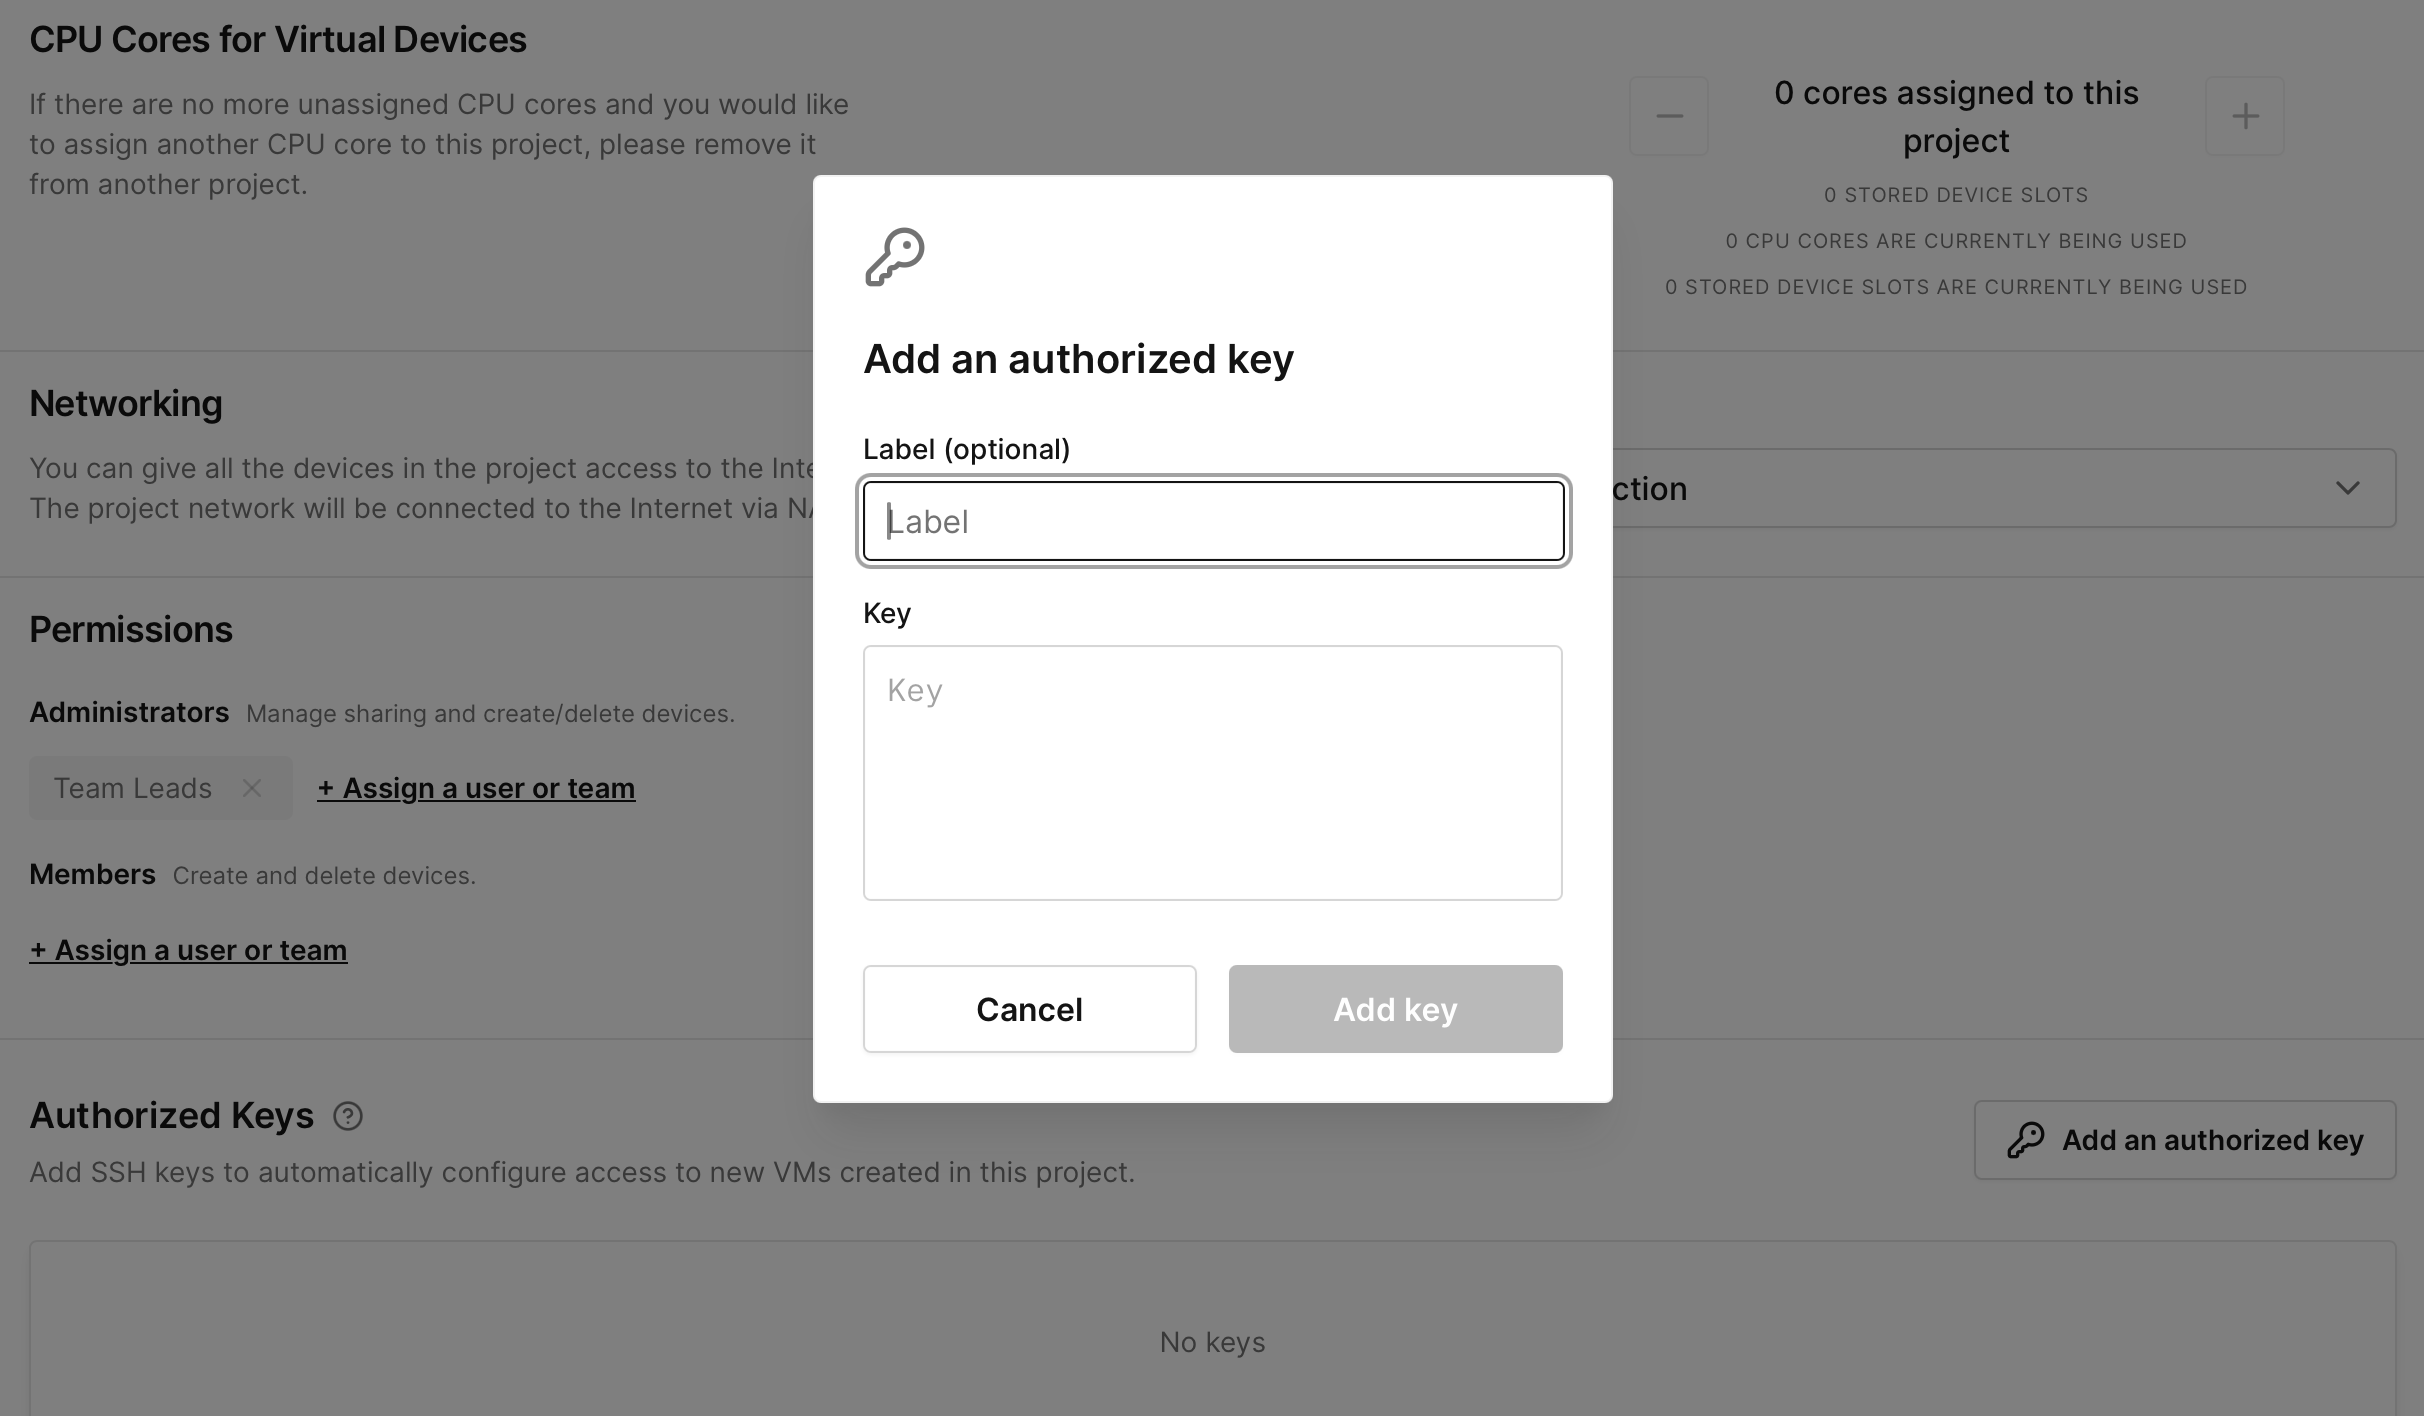
- On the Projects page, scroll down to the Authorized Keys section of the project and click Add an authorized key. Paste the entire output from and click Add Key. If you don't enter an optional label, the system will use your public key comment.
Add Your Public Key using Corellium API Calls
The Corellium API supports adding SSH keys to your project using the command line.
-
Install the Corellium API in the Terminal.
npm install @corellium/corellium-api -
In your Node.js file, log in to your endpoint.
const corellium = new Corellium({endpoint:'https://app.corellium.com',apiToken:'<your_API_token>'});

corellium.login(); -
Save your project as a variable. If you have an Individual domain, you will only have one project named "Default Project".
let project = await corellium.projectNamed('Default Project'); -
Add the SSH key to your project using the project.addKey method. Alternatively, you can use the Corellium.addProjectKey method.
await project.addKey('ssh-ed25519 AAAAC3NzaC1lZDI1NTE5AAAAIH9Mo34lnhVXISRum4uQIPx2VMRHQ/24Jm303N5osjde','ssh','myKeyLabel');
The parameter key must include the encryption algorithm for your key. For example, if cat ~/.ssh/id_ed25519.pub returns ssh-ed25519 AAAAC3NzaC1lZDI1NTE5AAAAIH9Mo34lnhVXISRum4uQIPx2VMRHQ/24Jm303N5osjde [email protected] the key parameter would be ssh-ed25519 AAAAC3NzaC1lZDI1NTE5AAAAIH9Mo34lnhVXISRum4uQIPx2VMRHQ/24Jm303N5osjde.
Verify Your SSH Key on iOS Devices
After you add the public key to your project, all devices you create under that project will automatically include the public key.
Keys are automatically copied to iOS devices during creation. Keys are not copied to Android devices during creation.
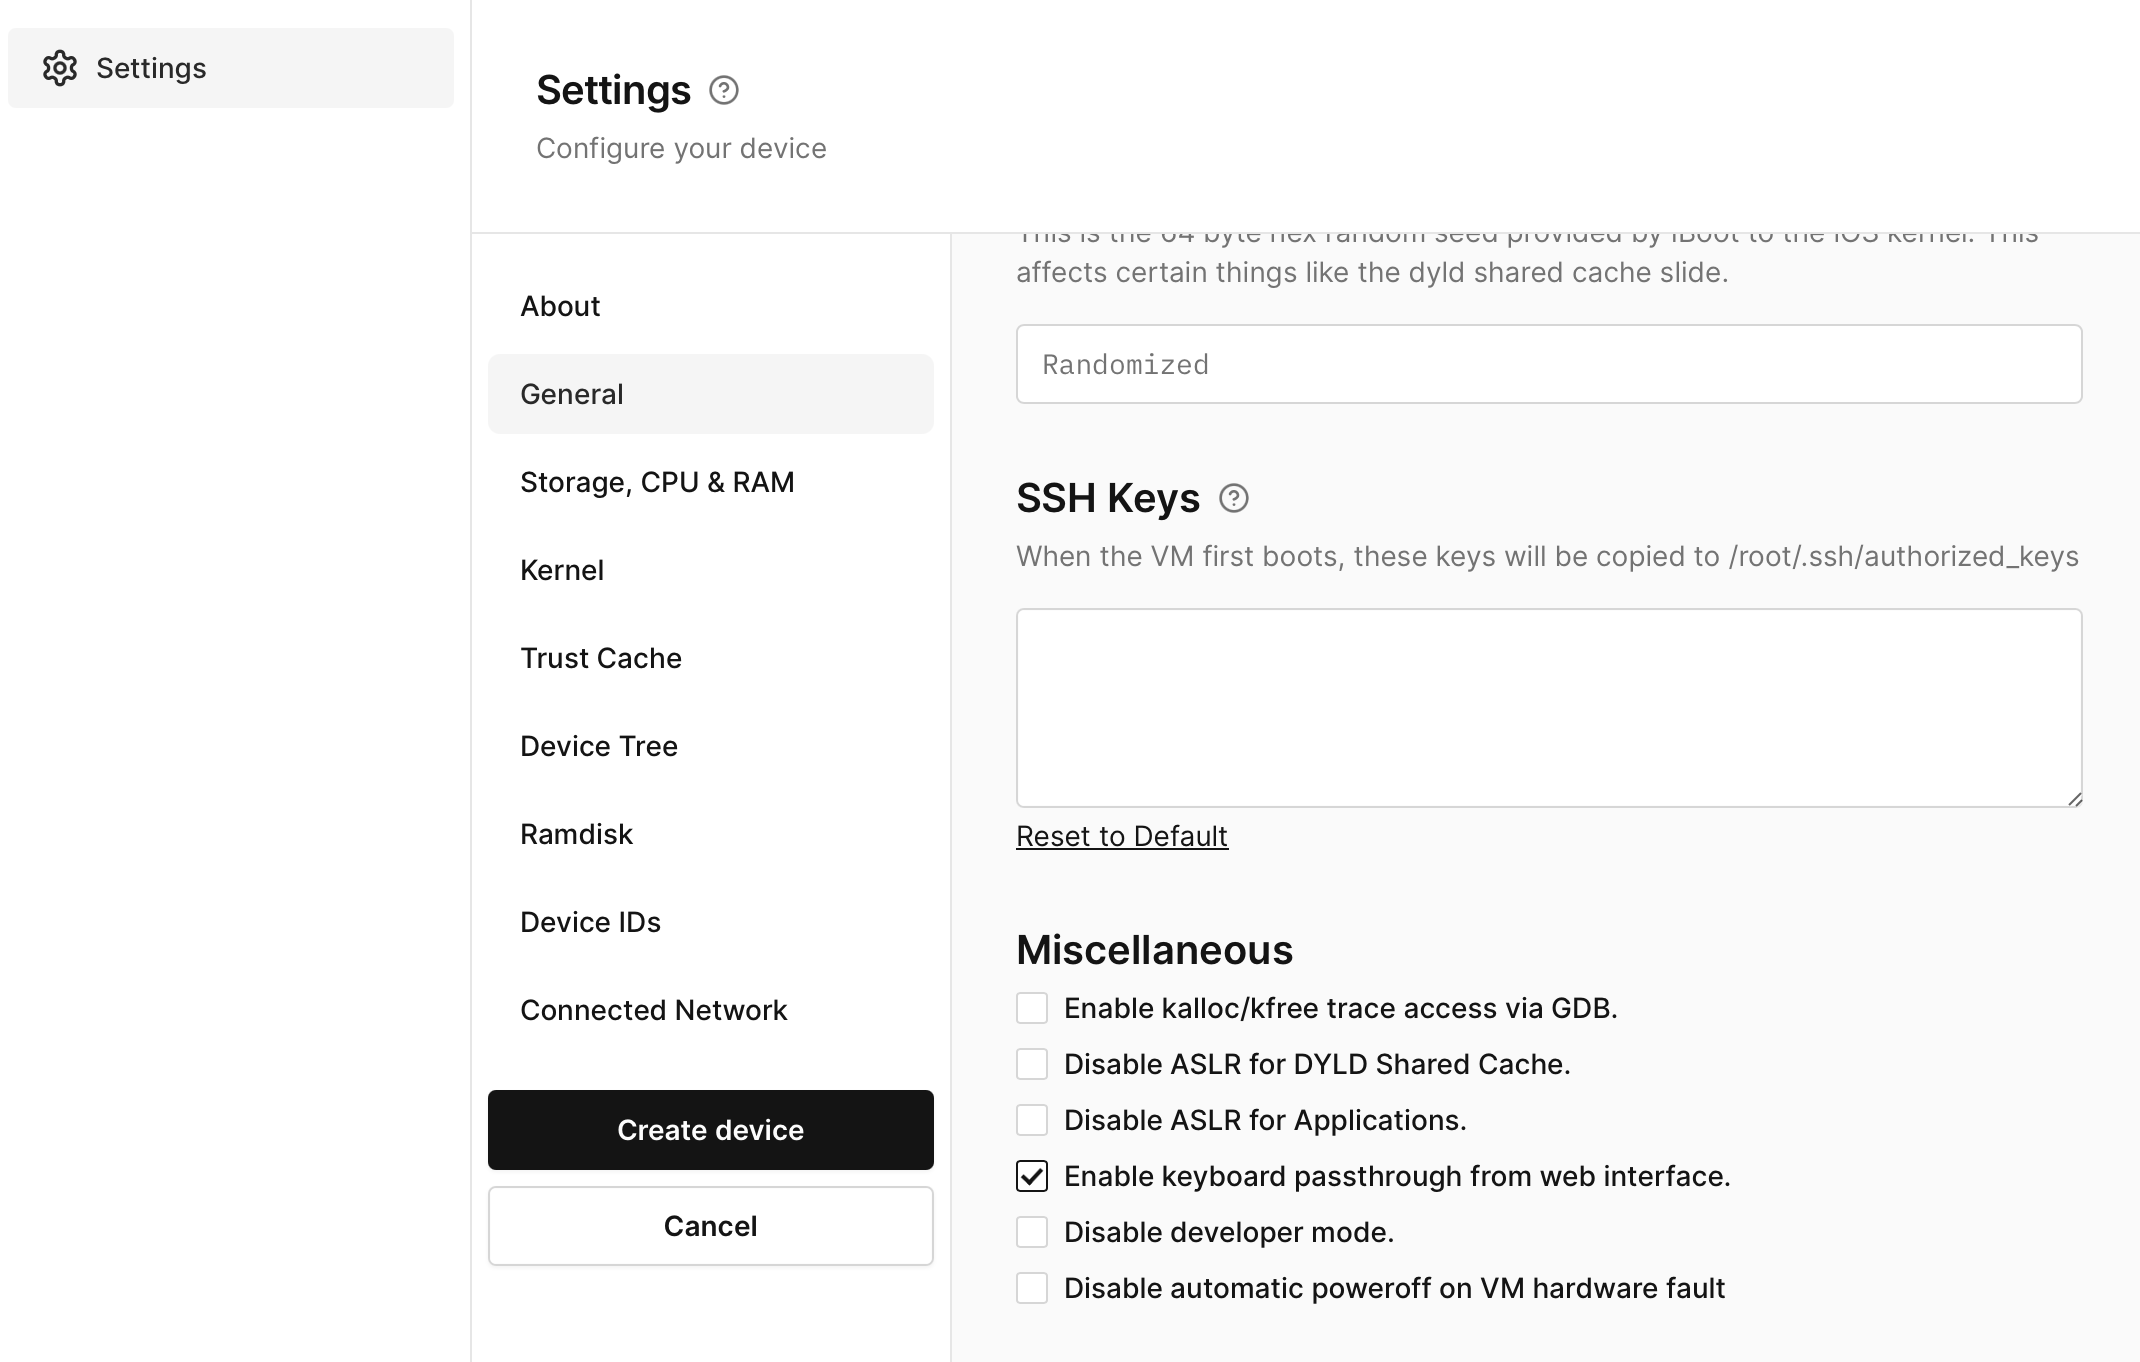
To see what keys will be available to the device when it creates:
-
Create a new non rapid start iOS device, then enter advanced boot options.
-
Next click General then scroll down to SSH Keys.
-
You should see the public key you added to the project appear here.
Add an SSH Public Key to an Existing iOS Device
At any point, you can add an SSH public key to an existing iOS device in order to bypass password authentication.
To do this simply, edit this file on this device:
/var/root/.ssh/authorized_keys
Then on a new line, paste the contents of your SSH public key (in ed25519 or RSA format) then save the file. This does not necessarily have to be the same key that was added to your project.
When initiating an SSH connection to the device, you must use the private key that corresponds to the public key added to the device. Depending on the name and location of your private key file, your SSH client may not automatically attempt to use the correct key.
You can confirm which keys are being attempted for authentication by adding verbosity to your SSH command using -vvv (up to three levels of verbosity).
To ensure the correct private key is used, you can explicitly specify it using the -i flag:
ssh -i /path/to/private_key root@<device_service_ip>
Alternatively, you can configure this in your ~/.ssh/config file:
Host <device_service_ip>
        IdentityFile /path/to/private/key
If no identity file is specified, the SSH client will attempt to use default key names such as id_rsa or id_ed25519.
Quick Connect to Your Jailbroken iOS Device
-
Find Quick Connect at the top of the Connect tab on your jailbroken iOS device. Copy the
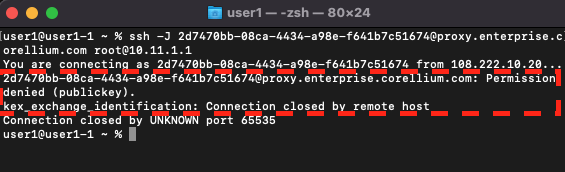
ssh -J ...command and run it in Terminal or PowerShell.infoIf you see a
Permission denied (publickey)error followed bykey_exchange_identification: Connection closed by remote host, please to the troubleshooting section lower down the page.

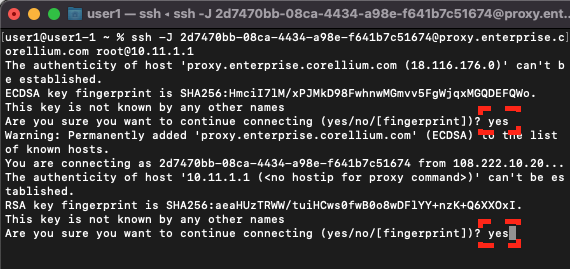
- The first time you connect, you will need to confirm the ECDSA key fingerprints. Type yes when asked about connecting to the proxy server (for example
proxy.corellium.comorproxy.enterprise.corellium.com) and to your specific device (for example10.11.1.1). This step only happens once.
- You will see the
iPhone:~ root#prompt once your computer is connected.
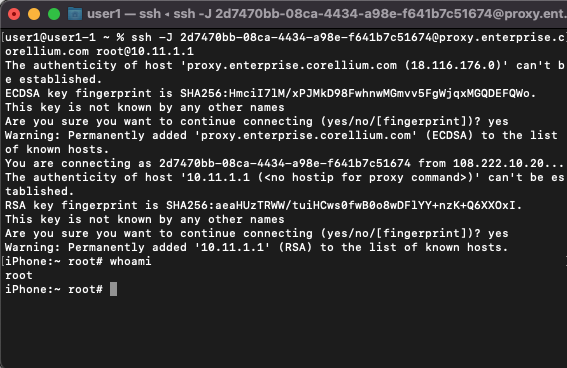
- When you are finished, press Ctrl+D or type
exitto disconnect from the virtual device and return to your local computer.

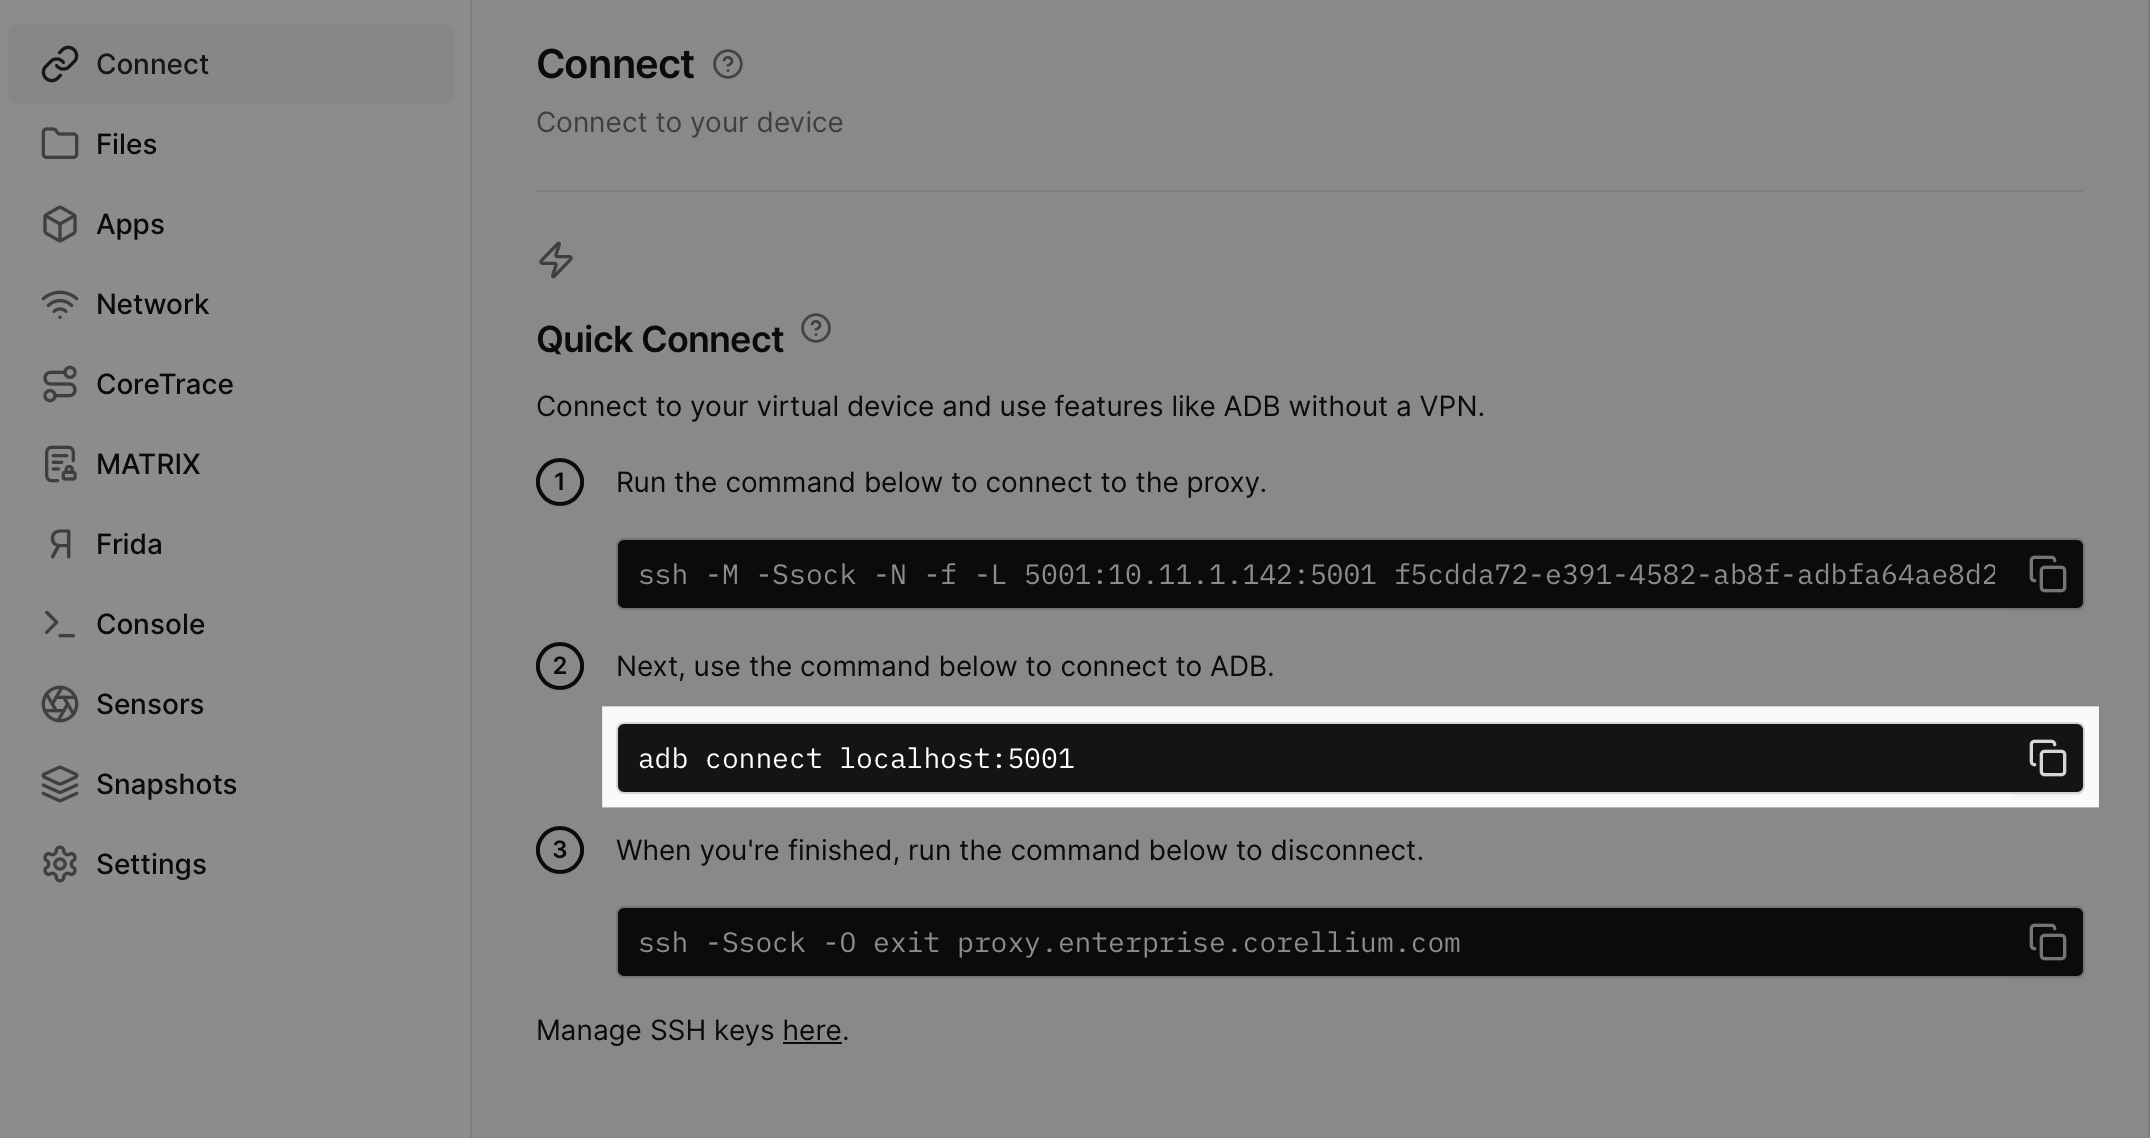
Quick Connect to Your Android Device
-
On your Android virtual device, find Quick Connect at the top of the Connect tab. Copy the
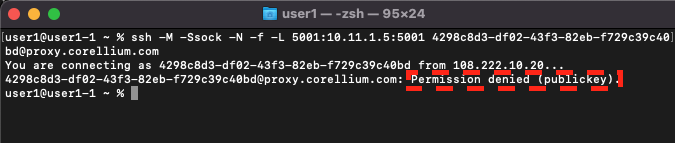
ssh -M ...command and run it in Terminal or PowerShell.infoIf you see a
Permission denied (publickey)error followed bykey_exchange_identification: Connection closed by remote host, please to the troubleshooting section lower down the page.
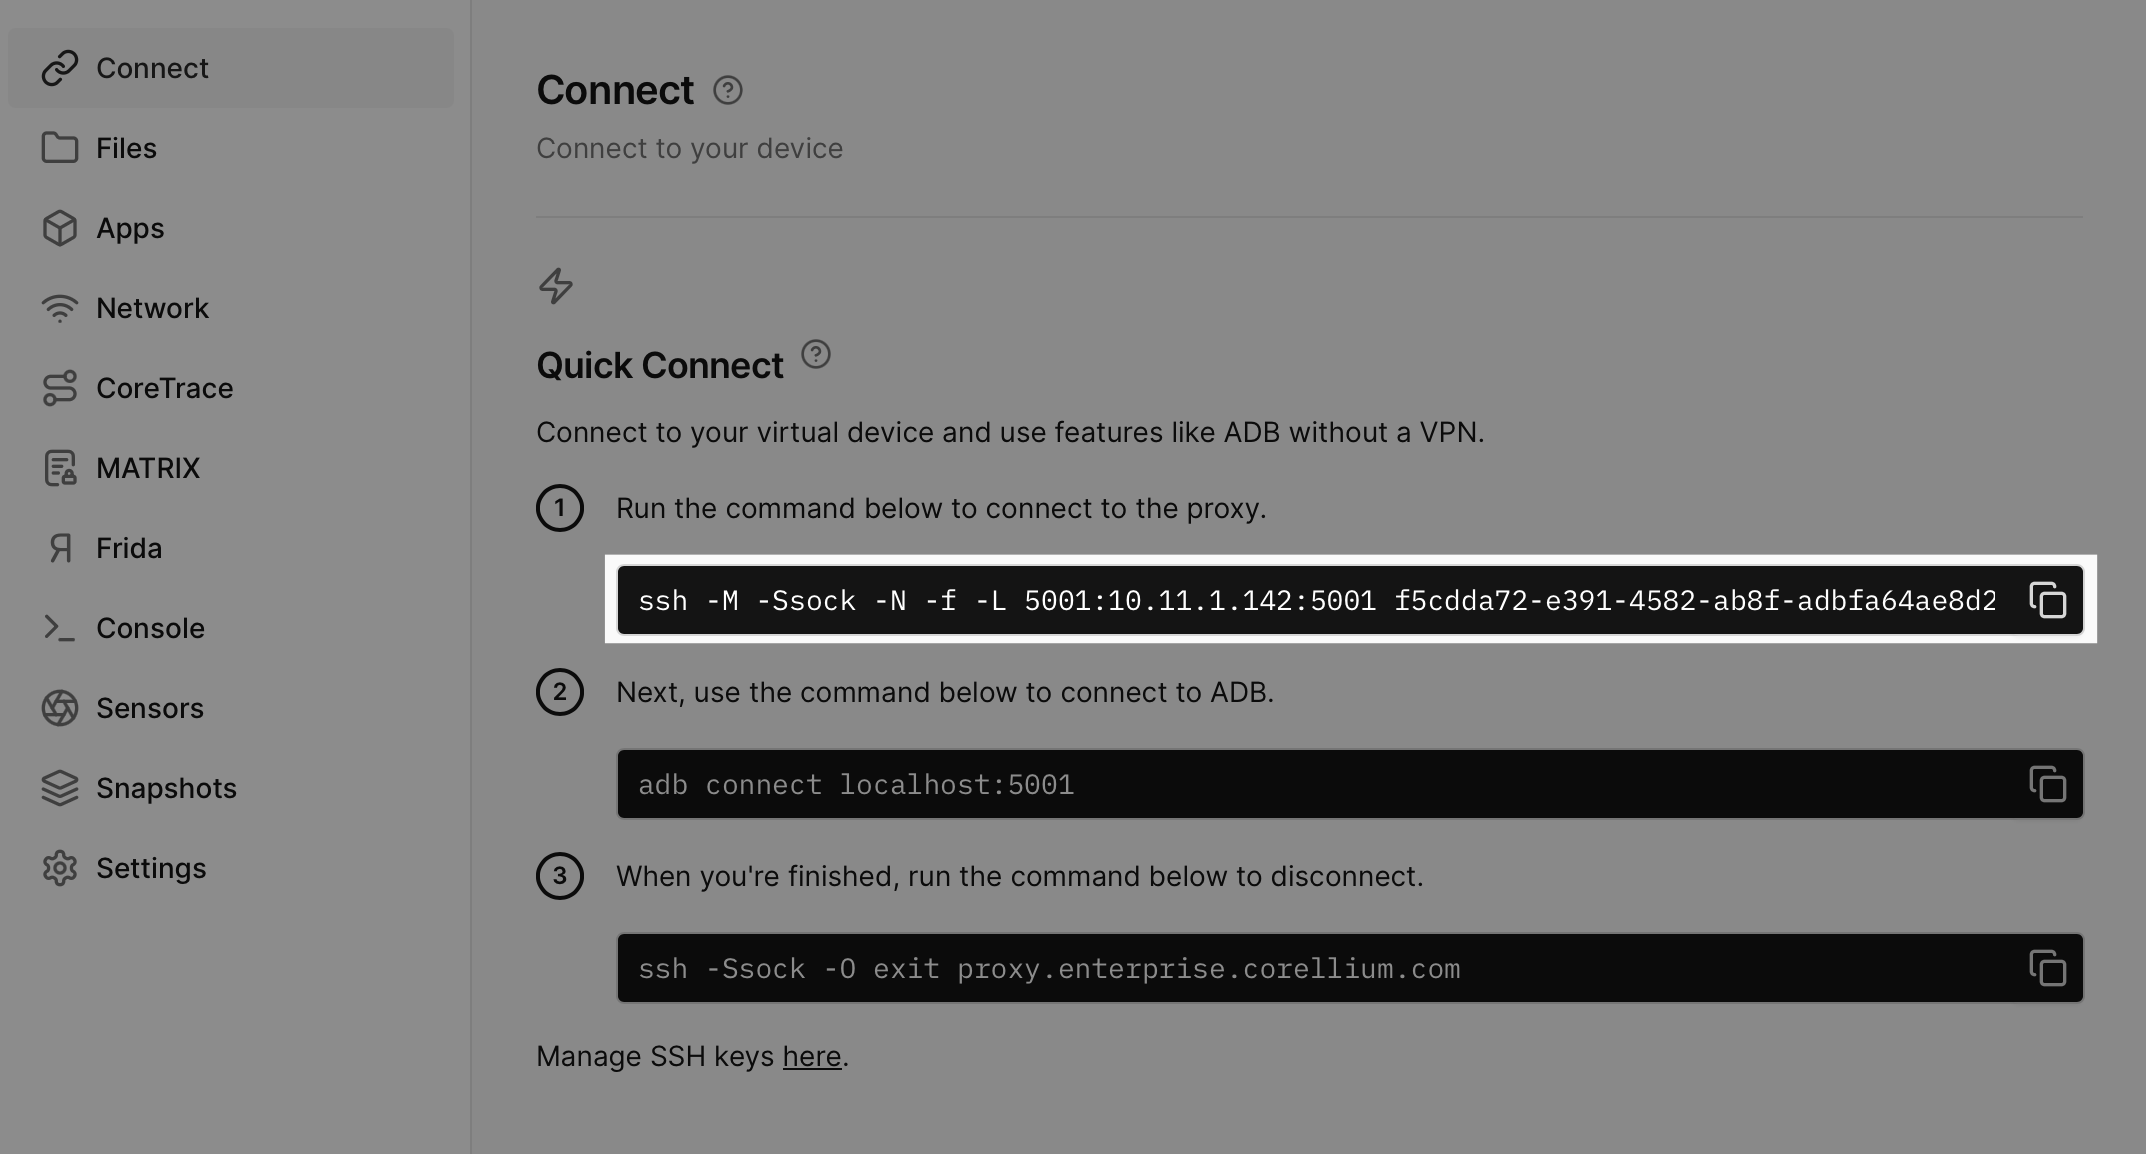
- Copy the
adb connect localhost:5001command and run it in Terminal or PowerShell.
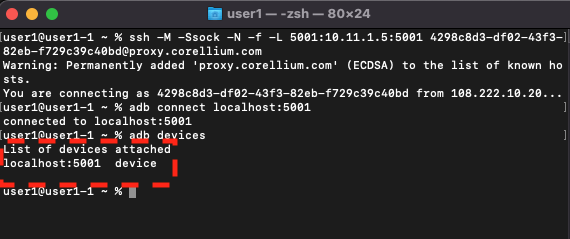
- Use
adb devicesto confirm you are connected to your Android virtual device. You should see a response showing that localhost:5001 is attached.
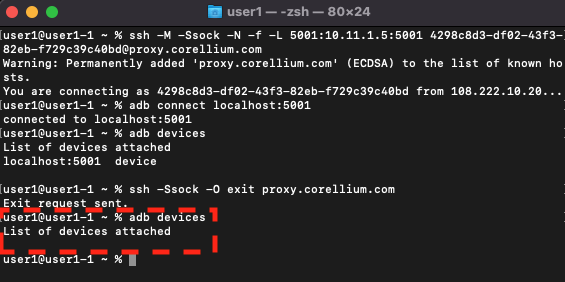
- When you are finished, copy the third command and paste it into Terminal or PowerShell to close the SSH sock. You should see
Exit request sent.
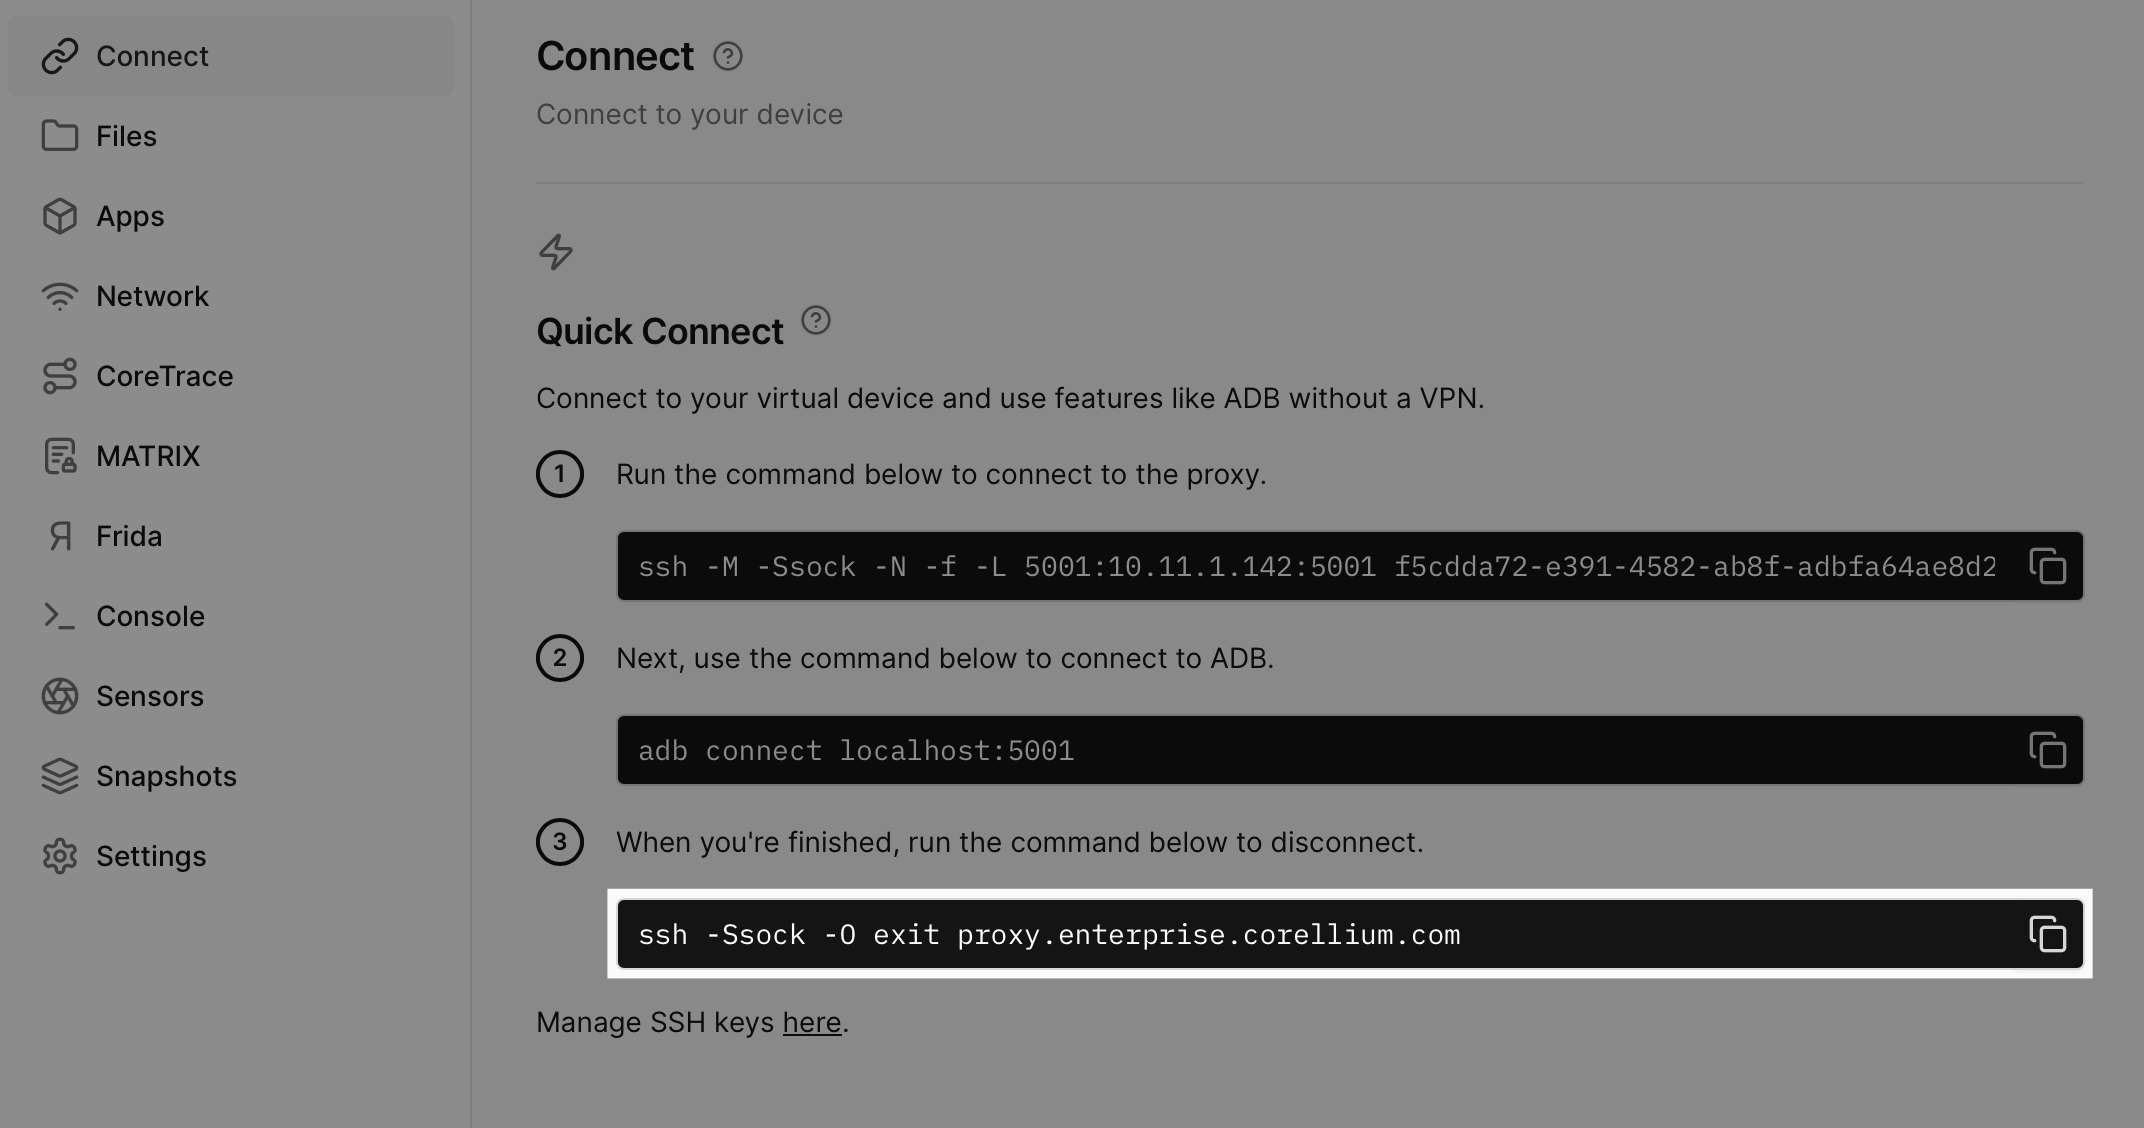
- Confirm you are disconnected using
adb devices. You should see that the localhost:5001 device is no longer listed.
Advanced Uses of Quick Connect
Because Quick Connect uses SSH tunneling to work, this command can be modified to fit different use cases beyond standard SSH or ADB connections to your devices.
Proxy Traffic Without the VPN
We've modified the Quick Connect command in order to show how to proxy traffic with Burp Suite without requiring connecting to the Corellium VPN. See here.
Use Frida without the VPN
This guide shows how to use and modify the Quick Connect command in order to connect to the frida-server on the device without requiring the VPN.
Troubleshooting
We have compiled some errors you might see during the Quick Connect process.
Permission Denied Error
If you see an error saying Permission denied (publickey), your public key is not properly configured on your project or the device.
You will see this error for several reasons:
- You haven't added an SSH public key to your project.
- Please follow the steps in the Add an Authorized SSH Public Key section above.
- Your SSH key is not in ed25519 format so the SSH client did not automatically attempt to use your custom named key.
- To resolve this, either specify an IdentifyFile for the Corellium proxy server in
~/.ssh/configor manually specify the private key to use for authentication with the-iargument in the SSH command.
- To resolve this, either specify an IdentifyFile for the Corellium proxy server in
Error with iOS devices:
Error with Android devices:
Remote Host Identification Has Changed
If you delete a device and create a new one, Corellium's controller might reuse the same IP address.
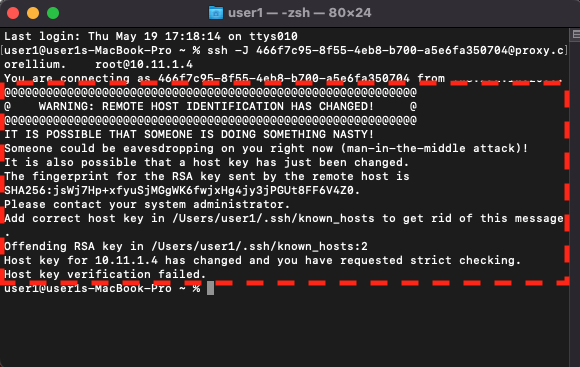
If this happens, you will see a message warning that the IP's fingerprint has changed and that "someone may be eavesdropping on you."
-
Delete the offending record from your
known_hostsfile. (In our example, we can see in the screenshot that the offending RSA key is in line 2, so we would usesed -i "" '2d' ~/.ssh/known_hosts.)# backup your known_hosts file
cp ~/.ssh/known_hosts ~/.ssh/known_hosts_backup
# replace # with the appropriate line number
sed -i "" '#d' ~/.ssh/known_hosts -
Retry the SSH command and approve the new host fingerprint.
-
Remove the backup file once you confirm the connection works.
rm ~/.ssh/known_hosts_backup
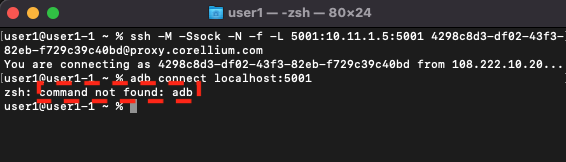
Android adb Command Not Found
If you see an error that the adb command is not found, you need to install the android-platform-tools package.
On macOS, install adb using Brew.
brew install android-platform-tools
On Ubuntu, install adb using the appropriate utility.
sudo apt install android-sdk-platform-tools
Android Address Already in Use
You may see an Address already in use error when running the ssh -M ... command for Android devices.
This error occurs when you attempt to open a connection that is already opened.
Connect to your device using the adb connect localhost:5001 command or close the connection using the ssh -Ssock ... command.
On macOS and Linux, you can optionally run pkill ssh to clean up any existing multiplexed SSH connections if you still see issues.
My iOS Device Doesn't Show a Quick Connect Section
If you can't find the Quick Connect section in the Connect tab, check the following:
- Verify that you are running either a jailbroken iOS device or a rooted Android device.
- Verify that the device is currently turned on.